Ever tried a Tiramisu Tart? This elegant dessert combines the creamy, coffee-infused magic of classic tiramisu with the structured beauty of a tart—giving you the best of both Italian and French pastry traditions in one irresistible slice.
Transform your dessert game with this show-stopping tiramisu tart that’ll have everyone asking for seconds. The buttery tart shell cradles layers of espresso-soaked ladyfingers and velvety mascarpone cream, all dusted with a snow of cocoa powder. It’s the perfect make-ahead dessert for dinner parties or special occasions when you want to impress without spending hours in the kitchen.
You’ll love how this modern twist maintains all the beloved flavors of traditional tiramisu while presenting them in an elegant, sliceable form that’s easier to serve than the classic spoonable version.
What Is Tiramisu Tart?
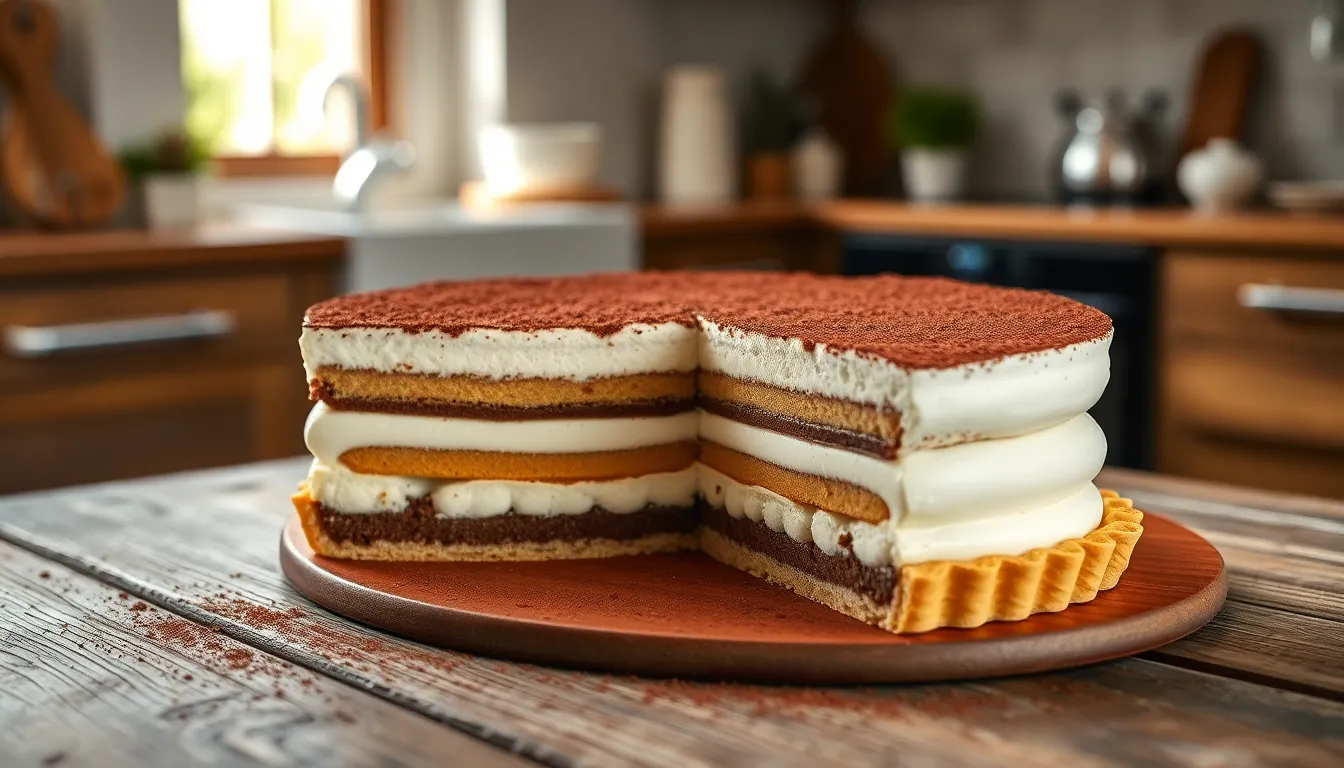
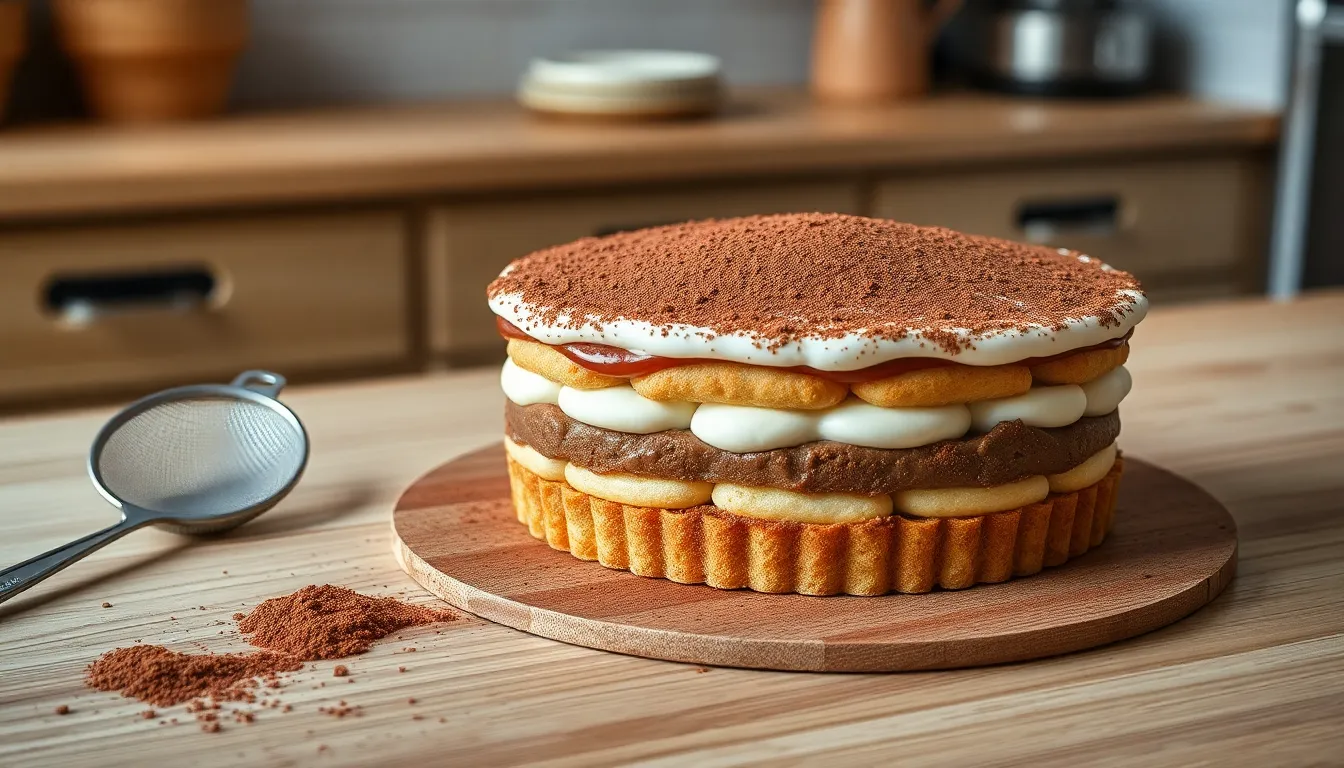
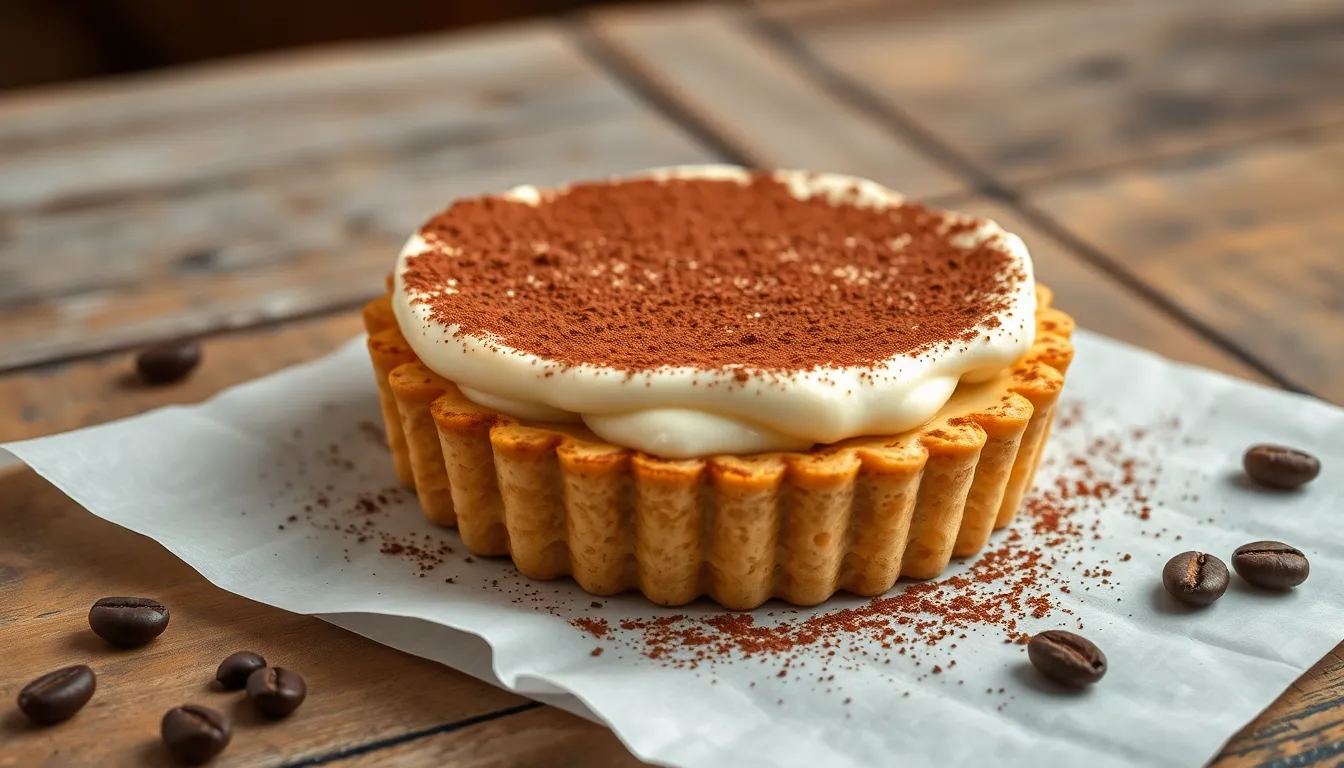
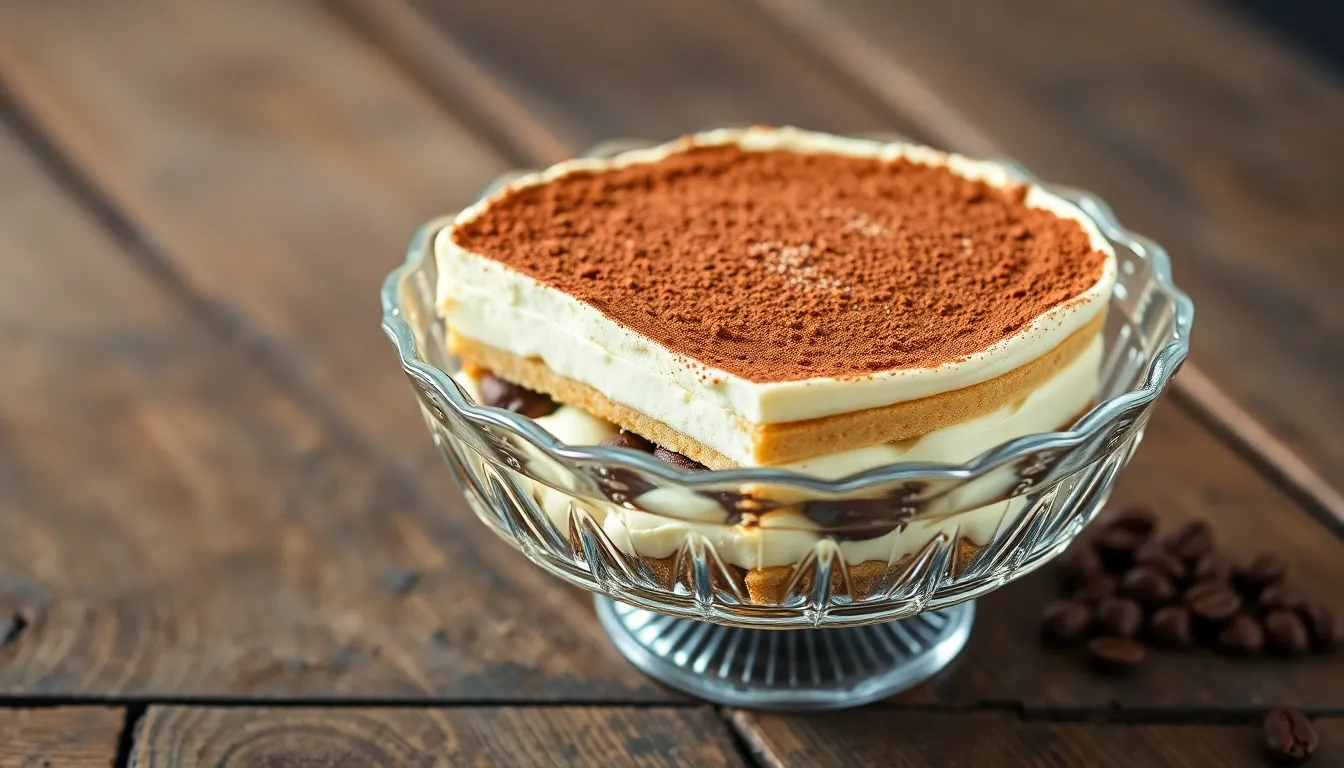
Tiramisu tart combines two beloved desserts into one showstopping creation. This Italian-inspired treat features a buttery shortcrust pastry shell filled with layers of espresso-soaked ladyfingers and creamy mascarpone filling. Unlike traditional tiramisu which is typically served in a dish or glass, the tart format provides structure and elegance with defined edges and a sliceable texture.
The dessert maintains all the classic tiramisu flavors – rich coffee, delicate mascarpone, and a hint of liqueur – but presents them in a more refined package. The contrast between the crisp tart shell and the soft, creamy filling creates a delightful textural experience with each bite.
What sets tiramisu tart apart is its sophisticated presentation. The neat slices reveal beautiful layers when served, making it an impressive option for dinner parties and special occasions. A light dusting of cocoa powder on top provides the signature tiramisu finish while adding a pleasant bitter note that balances the sweetness of the filling.
This hybrid dessert offers the best of both worlds: the familiar comfort of tiramisu’s flavor profile with the polished appearance and serving ease of a tart. Perfect for those who appreciate classic Italian desserts but desire something with a modern twist that’s both visually striking and delicious.
Recommended Products

Make authentic tiramisu cake at home with DeLallo's Tiramisu Kit. It's easy and delicious!
🍮 Heavenly Tiramisu Made Simple: Elevate your culinary skills with this effortless dessert mix that brings the iconic Italian Tiramisu to your home kitchen.

Make authentic tiramisu cake at home with DeLallo's Tiramisu Kit. It's easy and delicious!
Why You’ll Love This Tiramisu Tart
This elegant Italian-inspired dessert brings together the best elements of classic tiramisu and a traditional tart. The buttery shortcrust pastry provides a perfect foundation for the luscious coffee-infused filling. Each bite delivers the harmonious balance of textures that makes tiramisu so irresistible.
Unlike traditional tiramisu which requires careful scooping from a dish, this tart version slices cleanly for beautiful presentation every time. The defined layers create a stunning visual impact when served on a dessert plate. Your guests will be impressed by both the professional appearance and exceptional flavor profile.
Make-ahead convenience makes this dessert perfect for entertaining without last-minute stress. The tart actually improves with time as the flavors meld together in the refrigerator. Storage is simple since the tart shell keeps everything contained and prevents the dessert from absorbing other flavors in your refrigerator.
No special equipment or advanced techniques are required to create this showstopping dessert. If you can make a simple tart crust, you can master this recipe with ease. The familiar coffee and mascarpone flavors are complemented by the crisp pastry base for an elevated dining experience.
Versatility allows you to customize this tart to suit your preferences or dietary needs. Adjust the coffee strength, experiment with different liqueurs, or create a non-alcoholic version without sacrificing flavor. The recipe scales easily for larger gatherings or intimate dinners.
Recommended Products

Authentic Italian Taste: Made in Italy, Sanniti Savoiardi Ladyfingers bring the classic Italian flavor and light, airy texture that make them perfect for traditional recipes and everyday snacking.

FROM: The “Savoiardi”, which take their name from the original region of Savoy, are sweet and light biscuits with a very crumbly consistency.

Made with traditional savoiardi italian ladyfingers, these lady fingers for tiramisu are the classic choice for authentic Italian desserts, designed to absorb coffee and cream without falling apart.
Ingredients For The Tart Crust
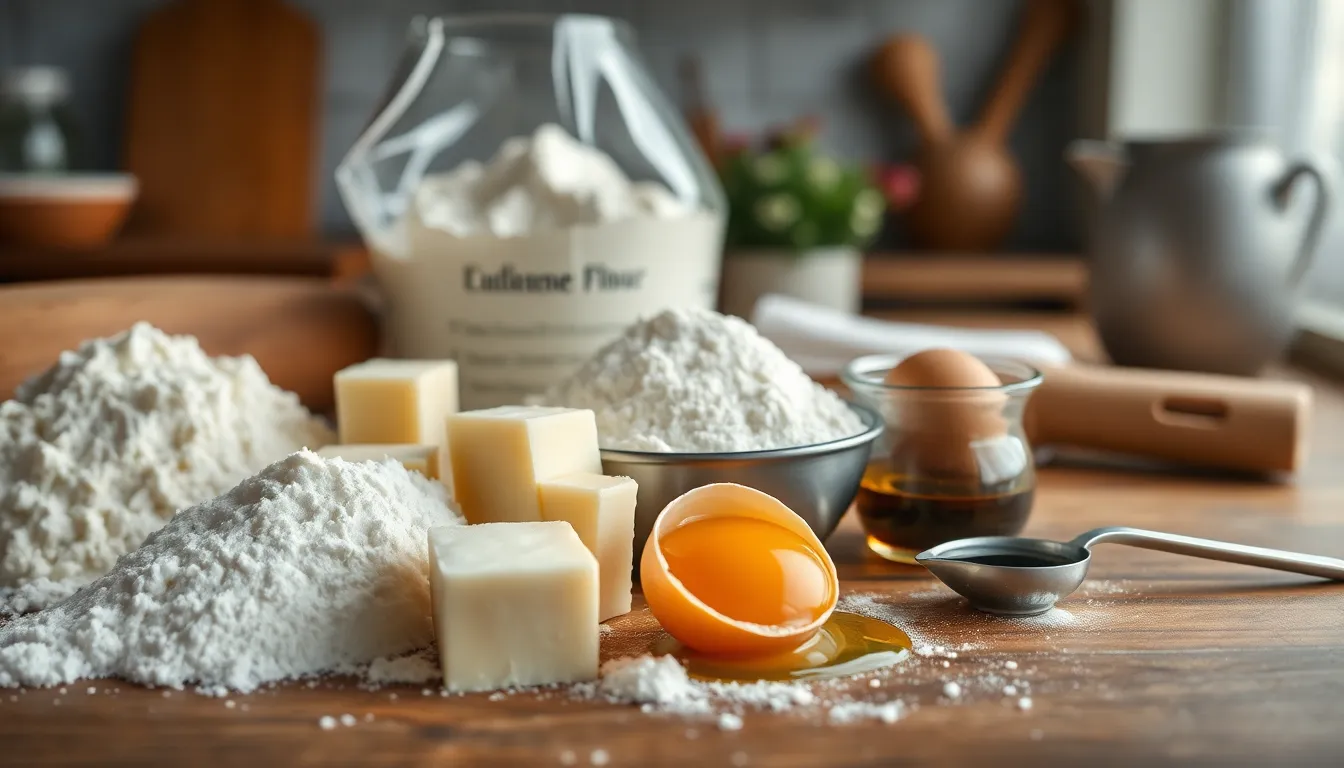
For the buttery shortcrust pastry shell that forms the foundation of our Tiramisu Tart, you’ll need these simple ingredients:
- 1¾ cups (210g) all-purpose flour
- ½ cup (60g) powdered sugar
- ¼ teaspoon salt
- ½ cup (113g) cold unsalted butter, cubed
- 1 large egg
- 1 teaspoon vanilla extract
- 1-2 tablespoons ice water (if needed)
This shortcrust pastry provides the perfect crisp contrast to the creamy tiramisu filling. The combination of butter and powdered sugar creates a delicate sweetness while maintaining a sturdy structure that holds up well against the moisture from the espresso-soaked ladyfingers. The vanilla extract adds a subtle flavor that complements the coffee notes in the filling without overwhelming them.
When selecting butter for your tart crust, opt for high-quality unsalted varieties to better control the salt content. Keeping the butter cold is crucial for achieving that perfect flaky texture that distinguishes an exceptional tart crust from an ordinary one. The egg binds everything together while adding richness to the final product.
Recommended Products

CRISP AND BUTTERY: Indulge in the delicate crispiness and rich buttery flavor of our pre-baked tart shells, perfect for creating gourmet desserts effortlessly.

FRENCH PATISSERIE STYLE TART SHELLS: Cambie's tart shells are crafted in the spirit of a classic French tart shell - buttery sweet, crisp, and delicious. Cambie's tart shells are ready to use and fill with your favorite filling - ganaches, fruit fillings, lemon curd, butters, and much more. Create professional style desserts that resemble what you'd find in a beautiful French Patisserie.
Ingredients For The Tiramisu Filling
To create the luscious mascarpone cream filling that defines this elegant tart, you’ll need these essential ingredients:
- 16 oz (450g) mascarpone cheese, softened at room temperature
- 1 cup heavy whipping cream, cold
- 3/4 cup powdered sugar, sifted
- 2 teaspoons pure vanilla extract
- 3 large egg yolks, at room temperature
- 2 tablespoons granulated sugar
- 1/4 cup coffee liqueur (such as Kahlúa) or marsala wine
- 12-15 ladyfinger cookies
- 3/4 cup strong brewed espresso or coffee, cooled
- 2 tablespoons unsweetened cocoa powder for dusting
The mascarpone cheese serves as the foundation of this filling, providing that signature creamy richness traditional to tiramisu. Premium quality mascarpone yields the best texture and flavor profile with its subtle sweetness and velvety mouthfeel.
Heavy whipping cream introduces lightness to the filling when whipped to soft peaks, creating an airy yet decadent texture that contrasts beautifully with the crisp tart shell. The combination of powdered and granulated sugars balances the filling’s sweetness while ensuring a smooth consistency without grittiness.
Egg yolks contribute crucial richness and help stabilize the cream filling, giving it structure while maintaining a luxurious texture. The vanilla extract enhances the overall flavor profile without overwhelming the delicate coffee notes that define tiramisu.
Ladyfingers briefly soaked in espresso form the distinctive coffee-infused layer that makes tiramisu instantly recognizable. The coffee liqueur adds depth and complexity, though you can adjust the amount based on your preference for a more subtle or pronounced flavor.
A final dusting of cocoa powder not only provides the classic tiramisu appearance but also introduces a slight bitterness that perfectly balances the sweet, creamy filling.
Kitchen Tools You’ll Need
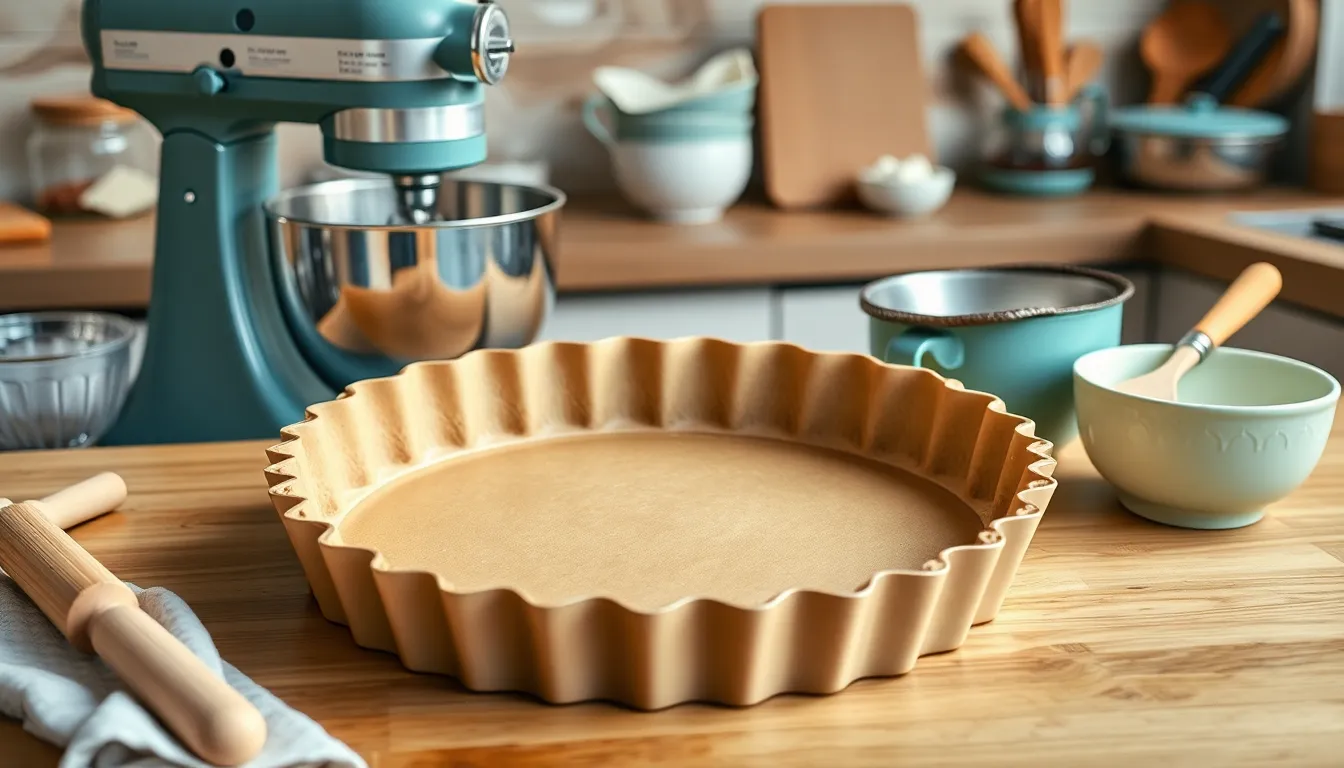
Creating this elegant Tiramisu Tart requires several essential tools to ensure perfect execution. Here’s everything you need to assemble before starting:
- 9-inch tart pan with removable bottom – Crucial for achieving clean edges and easy removal
- Stand mixer or hand mixer – For whipping the mascarpone filling to perfect consistency
- Mixing bowls – Several sizes for preparing different components
- Rubber spatula – For folding ingredients and scraping bowls
- Rolling pin – To roll out the shortcrust pastry evenly
- Parchment paper – For lining the tart shell during blind baking
- Pie weights or dried beans – To prevent the crust from bubbling during blind baking
- Fine mesh sieve – For dusting cocoa powder evenly
- Offset spatula – Helps spread filling smoothly
- Electric kettle or coffee maker – For brewing strong espresso
- Measuring cups and spoons – For precise ingredient measurements
- Shallow dish – For soaking ladyfingers in espresso mixture
- Refrigerator space – The tart needs proper chilling time
Your tart pan selection is particularly important as the removable bottom makes unmolding the finished dessert much easier while preserving its beautiful shape. The stand or hand mixer ensures your mascarpone filling achieves that light yet stable texture that defines a perfect tiramisu.
How To Make The Tart Crust
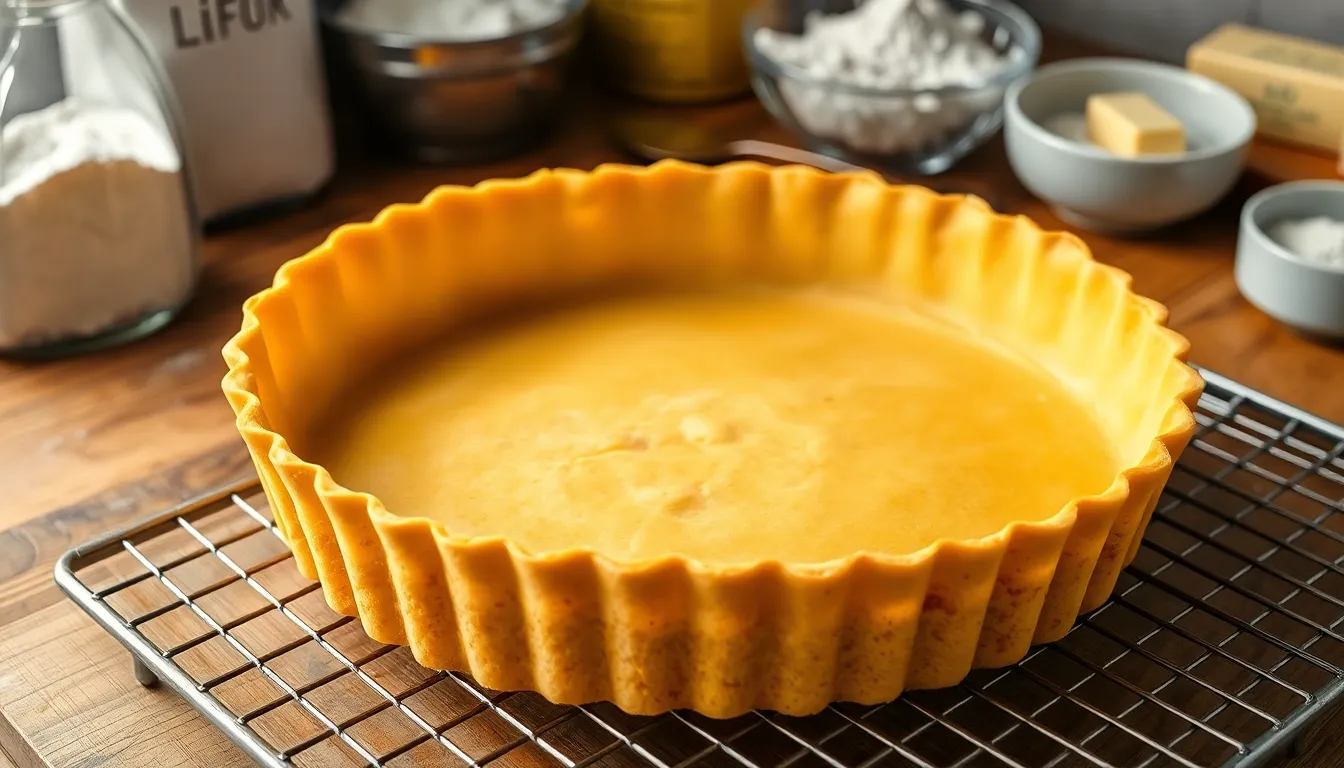
Creating a perfectly buttery shortcrust pastry shell is the foundation of this impressive Tiramisu Tart. This crust provides a crisp contrast to the creamy filling while holding everything together beautifully.
Preparing The Dough
Start by combining 1½ cups all-purpose flour with ½ cup powdered sugar and ¼ teaspoon salt in a large mixing bowl. Cut 8 tablespoons of cold unsalted butter into small cubes then incorporate it into the dry ingredients using your fingertips or a pastry cutter until the mixture resembles coarse crumbs. Make a well in the center and add 1 lightly beaten egg along with ½ teaspoon vanilla extract. Gently mix until the dough just comes together without overworking it. Form the dough into a disk shape and wrap it tightly in plastic wrap. Refrigerate for at least 1 hour to allow the gluten to relax and the butter to firm up again. This chilling step is crucial for preventing shrinkage during baking and ensuring a tender crust.
Remove the chilled dough from the refrigerator and let it sit at room temperature for about 5-10 minutes to slightly soften. Dust your work surface with a light coating of flour and roll the dough into a circle approximately 12 inches in diameter and ⅛ inch thick. Transfer the rolled dough to your 9-inch tart pan by carefully draping it over your rolling pin. Press the dough gently into the corners and sides of the pan without stretching it. Trim any excess dough by rolling your rolling pin over the top of the pan. Prick the bottom of the dough all over with a fork to prevent air bubbles from forming. Return the tart shell to the refrigerator for 30 minutes to chill again before baking.
Blind Baking The Crust
Preheat your oven to 375°F (190°C) while the tart shell is chilling. Cut a piece of parchment paper larger than your tart pan and crumple it slightly to make it more pliable. Place the parchment paper over your chilled tart shell and fill it with pie weights or dried beans to prevent the crust from puffing up during baking. The weights help maintain the shape of your tart shell by counteracting the tendency of the dough to shrink or bubble.
Bake the crust with weights for 15 minutes until the edges begin to turn golden. Carefully remove the parchment paper and weights then return the crust to the oven for an additional 10-12 minutes until it becomes evenly golden brown. Watch closely during this final baking stage as the exposed crust can quickly go from perfectly golden to overbrowned. Allow the fully baked tart shell to cool completely on a wire rack before filling it with your tiramisu components. The cooled crust will provide the ideal crisp foundation that contrasts beautifully with the soft mascarpone filling. A properly blind-baked crust ensures your final tart will have clean slices and hold its shape when served.
How To Make The Tiramisu Filling
The luscious mascarpone filling is the star of this elegant dessert. Creating this velvety mixture requires attention to detail but yields spectacular results that perfectly capture the essence of traditional tiramisu.
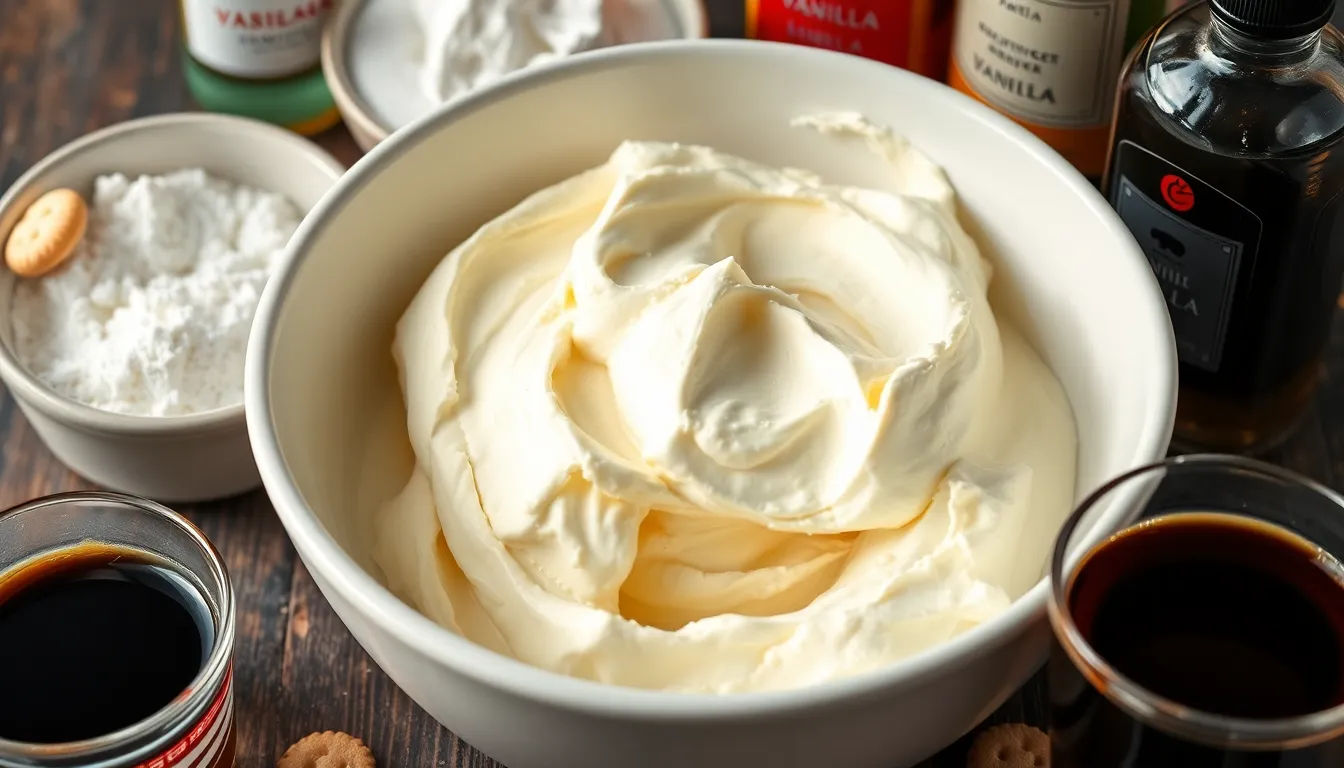
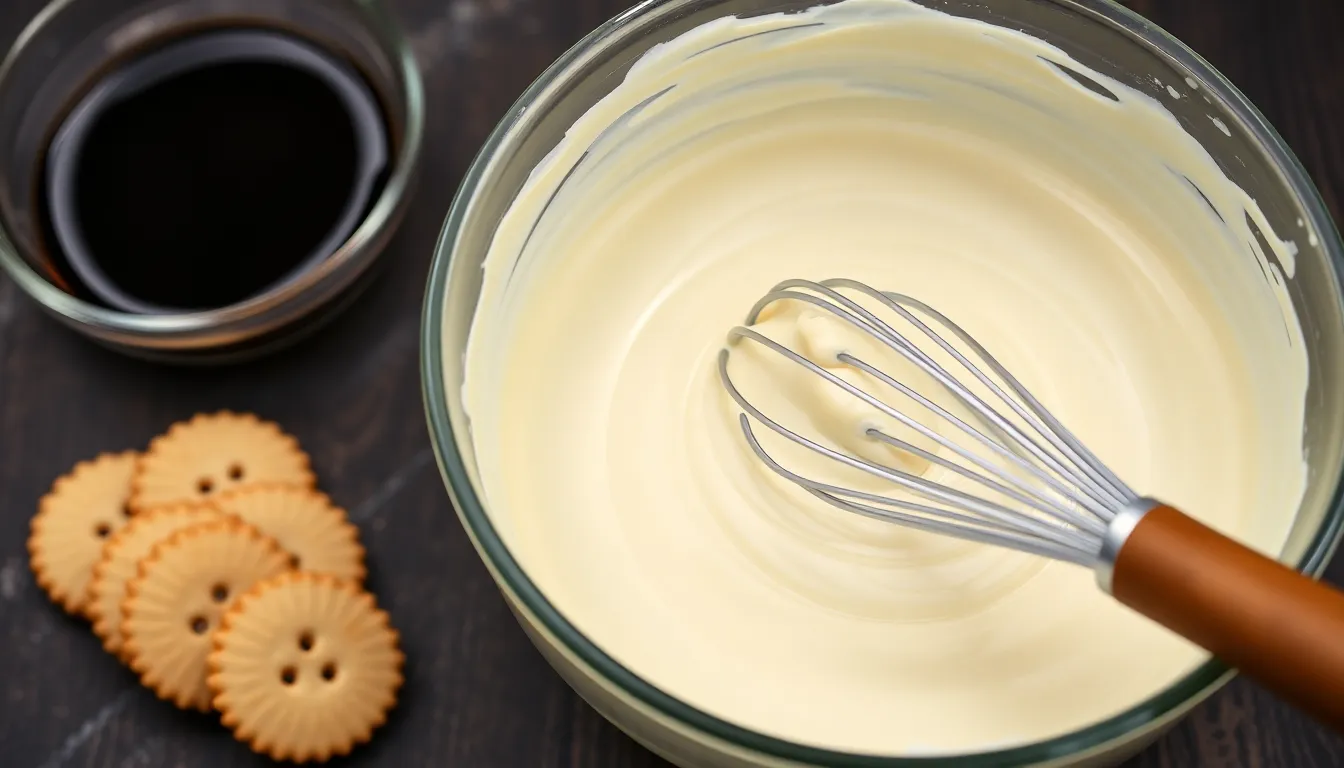
Preparing The Mascarpone Mixture
Begin by placing your mascarpone cheese in a large mixing bowl and allow it to soften slightly at room temperature for about 15 minutes. Softened mascarpone blends more smoothly and prevents any unwanted lumps in your final filling. Beat the mascarpone gently with a mixer on medium speed until it’s just smooth and creamy. Overbeating can cause the mascarpone to curdle so exercise restraint during this step.
In a separate bowl whip the heavy cream with powdered sugar and vanilla extract until stiff peaks form. The cream should hold its shape firmly when the beater is lifted but still maintain a glossy appearance. This whipped cream will add crucial lightness to your filling while maintaining structural integrity.
For the egg yolk mixture prepare a small heatproof bowl with the egg yolks and granulated sugar. Place this bowl over a pot of simmering water creating a double boiler ensuring the bottom of the bowl doesn’t touch the water. Whisk continuously until the mixture becomes pale and thickens slightly reaching about 160°F to ensure food safety. Remove from heat and continue whisking until the mixture cools to room temperature.
Fold the cooled egg yolk mixture into the mascarpone using a rubber spatula with gentle strokes. Incorporate the whipped cream next folding with an upward motion from the bottom of the bowl to maintain as much air as possible in the mixture. Your finished mascarpone filling should be light yet stable with a silky texture that holds its shape when spread.
Creating The Coffee Soaking Liquid
Brew a strong batch of espresso or very strong coffee and pour it into a shallow dish wide enough to accommodate your ladyfinger cookies. Fresh espresso provides the boldest flavor but instant espresso powder dissolved in hot water works well too. Allow the coffee to cool completely before using to prevent the ladyfingers from becoming overly soggy.
Stir your chosen liqueur—coffee liqueur or marsala wine—into the cooled espresso. This addition contributes depth and complexity to the classic tiramisu flavor profile. For a non-alcoholic version substitute with a tablespoon of vanilla extract or simply omit the liqueur entirely.
The soaking process requires careful timing for ideal texture. Quickly dip each ladyfinger into the coffee mixture rolling it to coat all sides. The cookies should absorb enough liquid to become flavored but remain structurally sound. A good rule is to limit soaking to 1-2 seconds per side; the ladyfingers will continue to soften as the tart rests.
Arrange these soaked ladyfingers in a single layer across the bottom of your pre-baked tart shell breaking them as needed to fit the space. The cookies should fit snugly together creating a solid foundation for your mascarpone filling while contributing the essential coffee flavor that defines a proper tiramisu.
Assembling The Tiramisu Tart
Now comes the exciting part where all your components come together to create a stunning dessert. Proper assembly ensures distinct layers and optimal flavor in every slice of your tiramisu tart.
Begin by arranging a single layer of espresso-soaked ladyfingers across the bottom of your cooled tart shell. Place them side by side with the soaked side facing down to prevent the crust from becoming soggy. Break pieces as needed to fill any gaps completely.
Spread half of the mascarpone cream mixture over the ladyfinger layer using an offset spatula. Create an even layer about 1-inch thick reaching all the way to the edges of the tart shell. Smooth the top with gentle strokes for a level surface.
Add a second layer of soaked ladyfingers on top of the cream layer. This time arrange them in a different pattern or direction for structural integrity when slicing. Ensure they’re properly soaked but not dripping with excess liquid.
Top with the remaining mascarpone cream mixture carefully spreading it to create a smooth domed surface. The final cream layer should completely cover all ladyfingers beneath it. Use your offset spatula to create decorative swirls if desired.
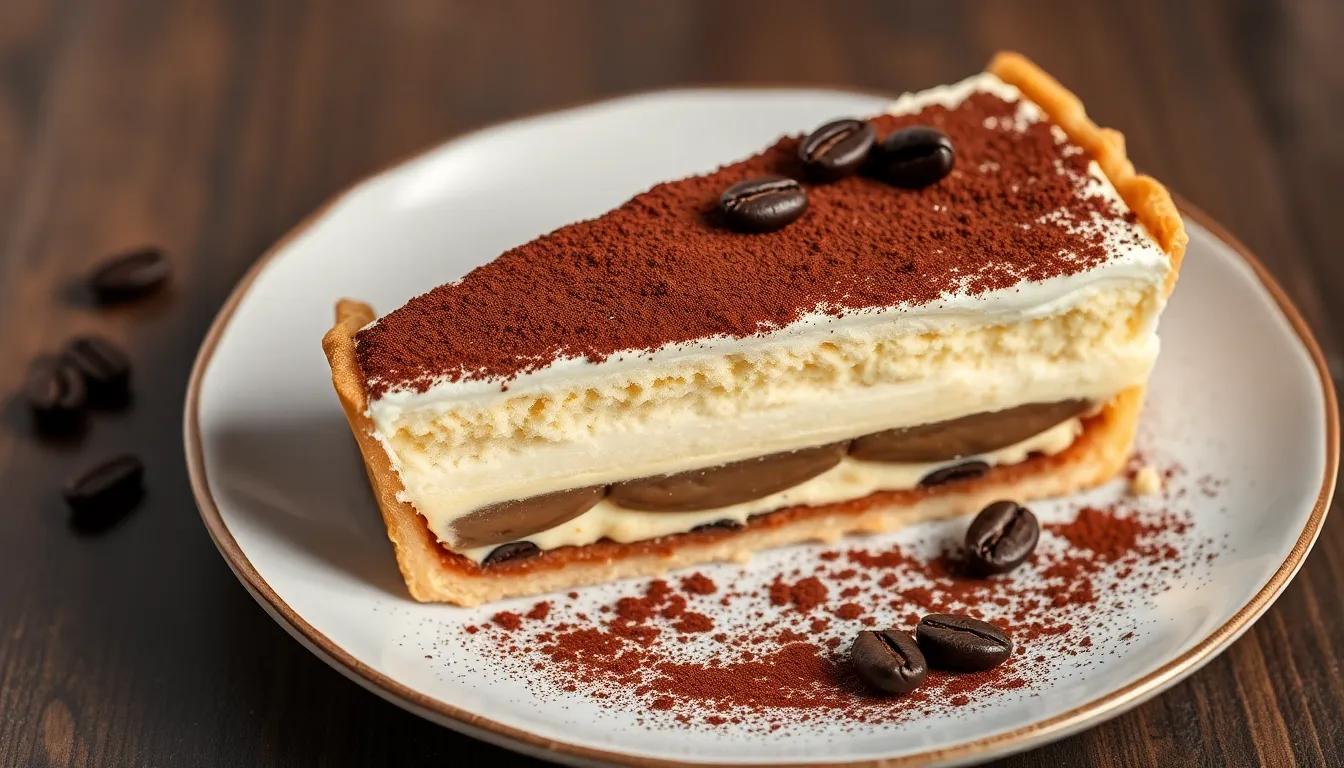
Dust the entire surface generously with cocoa powder using a fine mesh sieve. Hold the sieve about 6 inches above the tart and tap gently for even distribution. This not only provides the signature tiramisu finish but also balances the sweetness of the filling.
Refrigerate your assembled tart for at least 4 hours or preferably overnight. This resting period allows the flavors to meld together while the filling sets to the perfect sliceable consistency. The tart needs this time to develop its characteristic texture where the ladyfingers soften completely and absorb the surrounding flavors.
For an extra decorative touch before serving sprinkle additional cocoa powder along the edges or add chocolate curls to the center. Carefully remove the tart from the pan by pushing up from the removable bottom before slicing with a sharp knife.
Recommended Products

✅ 𝗚𝗥𝗘𝗔𝗧 𝗩𝗔𝗟𝗨𝗘! - 8 Ounce Bath and Dusting Body Powder for Women, 100% Talc-Free, in a Convenient and Generous Size for Long-Lasting Use.

Made with potato and corn starch, our absorbent and talc-free body powder adds a soft touch of fragrance while herbal extracts soothe and freshen the skin.

Light body powder for after the bath in fresh botanical scents.
Chilling And Setting
Properly chilling your Tiramisu Tart is crucial for achieving the perfect texture and flavor profile. After assembling all layers you must refrigerate the tart for a minimum of 4 hours before serving. This resting period allows the mascarpone filling to set firmly which ensures clean slices when you cut into the dessert.
During refrigeration several important processes occur. The ladyfingers continue to absorb the coffee mixture softening them to the ideal consistency. Simultaneously the mascarpone cream firms up becoming sliceable rather than flowing when cut. Most importantly the flavors meld together as the coffee notes infuse throughout the filling.
For optimal results refrigerate your Tiramisu Tart overnight. The extended chilling time transforms the dessert creating a more cohesive texture and deeper flavor profile. Cover the tart loosely with plastic wrap ensuring it doesn’t touch the surface to prevent condensation from dripping onto your carefully dusted cocoa powder.
The tart will maintain its best quality for up to 3 days when stored in the refrigerator. You’ll notice the flavors actually improve after the first 24 hours as the coffee and liqueur notes fully develop. The contrast between the crisp pastry shell and creamy filling becomes perfectly balanced making each bite more satisfying.
To check if your tart is properly set gently press the center with your finger—it should feel firm with slight resistance. The surface should appear matte rather than glossy and the edges should hold their shape when the tart pan is removed.
Serving Suggestions
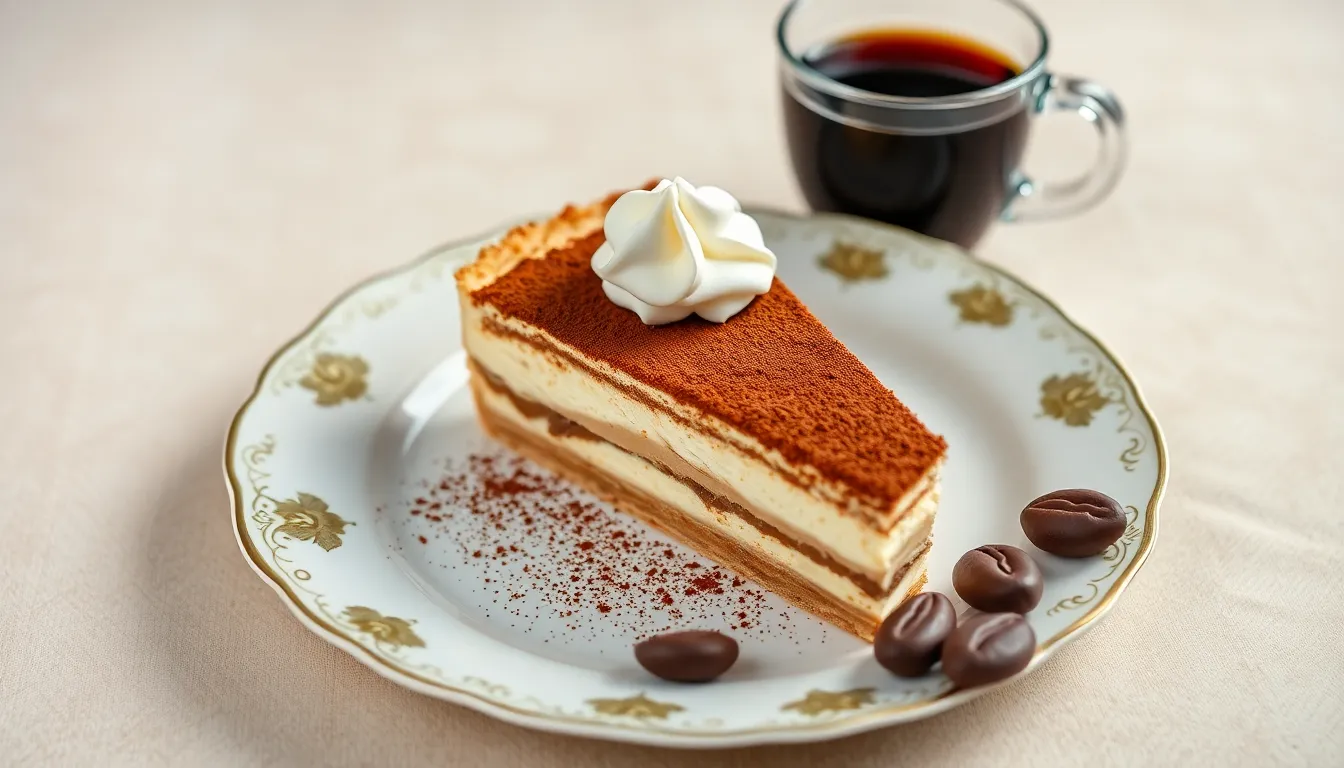
Elevate your Tiramisu Tart presentation with these serving ideas that enhance both the visual appeal and flavor experience. Present slices on dessert plates with a dusting of fresh cocoa powder applied just before serving to create a beautiful contrast. A small dollop of lightly sweetened whipped cream adds an extra touch of indulgence while complementing the coffee notes.
Consider accompanying each slice with a shot of espresso or a coffee liqueur to amplify the coffee flavors in the tart. For special occasions garnish plates with chocolate-covered espresso beans or chocolate curls which provide textural contrast and reinforce the coffee theme. Fresh berries such as raspberries or strawberries introduce a bright note that balances the richness of the mascarpone filling.
To create a complete dessert experience serve your Tiramisu Tart alongside a selection of after-dinner drinks. Amaretto coffee pairs beautifully with the almond notes often found in ladyfingers while a glass of dessert wine like Vin Santo creates an authentic Italian pairing experience. For non-alcoholic options hot chocolate or chai tea offer warming complements to this sophisticated dessert.
When serving at dinner parties slice the tart at the table for maximum impact allowing guests to appreciate the beautiful layers before enjoying their portion. The dessert should be slightly chilled but not cold which ensures the mascarpone filling maintains its creamy texture while the flavors fully express themselves. Remove the tart from refrigeration about 15-20 minutes before serving for optimal taste and texture.
Storage Tips
Properly storing your Tiramisu Tart ensures you can enjoy its delectable flavors for days after preparation. Keep the tart refrigerated in an airtight container to maintain freshness and prevent it from absorbing other food odors. Your tart will stay at peak quality for up to 3 days when stored correctly.
For best results leave the tart in its original pan until ready to serve individual slices. Cover the top with plastic wrap gently pressed against the surface to prevent condensation from forming on the cocoa powder topping.
The flavors actually improve after 24 hours as the coffee and liqueur further permeate the ladyfingers. Should you need to store leftover slices they can be individually wrapped in plastic wrap and placed in an airtight container.
Freezing is possible but not ideal for this dessert. The texture of the mascarpone filling may change slightly upon thawing becoming less creamy. If you must freeze it wrap the tart tightly in plastic wrap followed by aluminum foil and freeze for up to 1 month.
When ready to enjoy frozen Tiramisu Tart thaw it overnight in the refrigerator. Refresh the dessert with a new dusting of cocoa powder before serving to restore its elegant appearance.
Never store this dessert at room temperature for more than 2 hours due to the dairy content. The mascarpone cheese and cream are perishable ingredients that require consistent refrigeration to prevent spoilage.
Variations To Try
While the classic Tiramisu Tart is already a showstopper, these creative variations will let you customize this elegant dessert to suit different occasions and taste preferences.
Chocolate Hazelnut Tiramisu Tart
Transform your tiramisu tart into a Nutella lover’s dream by incorporating rich chocolate hazelnut flavors. Replace one-third of the mascarpone cheese with chocolate hazelnut spread for a deliciously nutty undertone throughout the filling. Add 2 tablespoons of hazelnut liqueur such as Frangelico to your coffee soaking liquid to enhance the hazelnut profile. Consider folding ½ cup of finely chopped toasted hazelnuts into the mascarpone cream for delightful texture and nuttiness. For an extra indulgent finish, drizzle the completed tart with melted chocolate hazelnut spread before serving and garnish with whole hazelnuts. This variation maintains the beloved coffee notes of traditional tiramisu while introducing complementary chocolate and hazelnut flavors that create a truly luxurious dessert experience.
Berry Tiramisu Tart
Create a fruity twist on the classic tiramisu tart by incorporating seasonal berries for freshness and vibrant color. Skip the coffee soaking liquid and instead mix ¼ cup of berry liqueur (like Chambord for raspberry or limoncello for a citrus berry combination) with ¼ cup of berry puree. Dip your ladyfingers in this fruity mixture rather than the traditional espresso solution. Layer fresh berries such as strawberries, raspberries, or blueberries between the mascarpone cream for bursts of juicy flavor and visual appeal. Add the zest of one lemon to your mascarpone filling to brighten the flavor profile and complement the berries. Arrange additional fresh berries on top of the tart instead of the traditional cocoa powder dusting, and finish with a light glaze of warmed apricot jam for a glossy presentation. This refreshing variation works particularly well for spring and summer gatherings when berries are at their peak.
Troubleshooting Tips
Crust Problems
Dealing with a crumbly tart crust? Add ice water one teaspoon at a time until the dough just comes together. If your crust shrinks during blind baking make sure you’re properly chilling the dough before baking and extending the crust slightly above the rim of the tart pan. For a soggy bottom ensure you’re blind baking until the crust is fully golden and let it cool completely before adding filling.
Filling Issues
Mascarpone mixture curdling is a common issue caused by overmixing or using cold ingredients. Always bring mascarpone to room temperature and fold gently rather than beating vigorously. If your filling is too runny whip the heavy cream to stiffer peaks or add an extra tablespoon of powdered sugar to stabilize the mixture. For grainy texture check that you’ve tempered the egg yolks properly by slowly adding hot liquid while constantly whisking.
Ladyfinger Concerns
Ladyfingers that dissolve too quickly have been over-soaked. Dip each cookie for just 1-2 seconds per side in the coffee mixture. Conversely if your ladyfingers remain too dry and crunchy after chilling increase soaking time slightly. Consider brushing additional coffee mixture onto assembled layers if needed for more pronounced coffee flavor.
Setting Problems
If your tart doesn’t set properly after the recommended chilling time refrigerate for several more hours. The filling may need additional time to firm up especially in humid environments. Using a water bath when cooking the egg yolk mixture helps achieve the right consistency for proper setting. For tarts that remain too soft try reducing the amount of liquid in the coffee soaking mixture.
Cocoa Powder Issues
Cocoa powder disappearing into the filling happens when it’s applied too early. Add the final dusting just before serving for the most attractive presentation. To prevent cocoa from creating a bitter taste use Dutch-processed cocoa which offers a smoother flavor profile. Apply the powder with a fine mesh sieve held several inches above the tart for the most even distribution.
The Perfect Tiramisu Tart Every Time
This Tiramisu Tart transforms a beloved Italian classic into an elegant dessert that’s sure to impress at your next gathering. With its buttery crust and creamy mascarpone filling it offers the perfect balance of textures and flavors in every slice.
You’ll find this dessert surprisingly approachable even though its sophisticated appearance. The make-ahead nature makes it ideal for entertaining while the clean slices ensure picture-perfect presentation every time.
Whether you’re celebrating a special occasion or simply craving something extraordinary this dessert delivers the comforting coffee-infused flavors of traditional tiramisu in a refined tart form. Give it a try and discover why this stunning reinvention deserves a permanent place in your dessert repertoire.
Frequently Asked Questions
Recommended Products
【Multiple Size Combinations】: 11 inch tart pan: 11*1.2in (28*3cm); 9 inch tart pan: 9.4*1.2in (24*3cm); 4 inch tart pan: 3.94*0.8in(10*2cm). You can make suitable size of pies/tarts/quiches you want, perfect for making delicious desserts like chocolate tarts, mini cake, tartlet, quiche and other.

【HIGH QUALITY】: The RICHSC-PAN non-stick pan 9-inch detachable tart pan with a loose bottom is made of heavy-duty carbon steel structure and high-quality non-stick coating, which is not easy to leak and is easy to take out. The quiche pan is a must-have for families and parties. Valentine's Day gift

❖ Exceptional Quality: If you are looking for an investment-worthy pan that is durable & rust-resistant, then our heavy-duty tart pan made of scratch-free carbon steel is the best. It will maintain its shape even at a temperature from -105 to 600°F
What is a Tiramisu Tart?
A Tiramisu Tart combines classic tiramisu flavors with a tart structure. It features a buttery shortcrust pastry shell filled with espresso-soaked ladyfingers and mascarpone cream, topped with cocoa powder. Unlike traditional tiramisu served in a dish, this version offers defined edges, a sliceable texture, and an elegant presentation while maintaining the beloved coffee and mascarpone flavors.
How far in advance can I make Tiramisu Tart?
You can make Tiramisu Tart up to three days in advance. In fact, the flavors improve after the first 24 hours of refrigeration. For best results, prepare it at least 4 hours before serving to allow the filling to set properly and the flavors to meld together. Keep it refrigerated in its tart pan until ready to serve.
Can I freeze Tiramisu Tart?
Yes, you can freeze Tiramisu Tart, though it may slightly alter the texture of the mascarpone filling. Wrap it well in plastic wrap and aluminum foil before freezing. Thaw overnight in the refrigerator before serving. For best flavor and texture results, consuming it fresh within three days of preparation is recommended.
What if I don’t have a tart pan with removable bottom?
A tart pan with removable bottom is highly recommended for easy removal and clean edges. If unavailable, you could use a springform pan as an alternative, though the sides will be higher. Line the pan with parchment paper extending up the sides to help lift the tart out. A pie dish is less ideal but can work if you’re willing to serve directly from it.
How do I prevent my tart crust from getting soggy?
Blind bake the crust completely before adding any filling. Use parchment paper and pie weights to prevent the crust from puffing up. Ensure the crust is fully cooled before adding fillings. For extra protection, you can brush the inside of the baked crust with a thin layer of melted white chocolate and let it set before adding the ladyfingers.
What alcohol can I use in Tiramisu Tart?
Traditional options include coffee liqueur (like Kahlúa), marsala wine, or rum. Amaretto, brandy, or dark rum are excellent alternatives. For a non-alcoholic version, use additional espresso mixed with a splash of vanilla extract. Each choice will bring a slightly different flavor profile to your tart while maintaining its essential character.
Why is my mascarpone filling runny?
Runny filling usually results from overbeating mascarpone (which causes it to curdle) or insufficient whipping of the cream. Ensure mascarpone is just softened, not warm. Whip cream to stiff peaks separately before folding in. Chill all ingredients beforehand. If your filling is already runny, try refrigerating it for 30 minutes before assembling the tart.
How do I know when the Tiramisu Tart is properly set?
A properly set Tiramisu Tart should feel firm with slight resistance when gently pressed in the center. The mascarpone filling should not jiggle when the pan is lightly shaken. This typically requires at least 4 hours of refrigeration, though overnight is ideal. The tart should slice cleanly with defined layers visible when cut.
Can I make Tiramisu Tart without eggs?
Yes, you can make an eggless version by omitting the egg yolks and increasing the heavy cream slightly. Another option is using whipped aquafaba (chickpea liquid) as an egg substitute. The texture will be slightly different—less rich but still delicious. Ensure your mascarpone mixture is well-chilled to help it set properly without the eggs’ stabilizing effect.
How do I prevent ladyfingers from becoming too soggy?
Quick dipping is key—soak each side of the ladyfinger in the espresso mixture for just 1-2 seconds. Don’t submerge them completely. The cookies should absorb some liquid but still maintain their structure. If using softer, cake-style ladyfingers, an even quicker dip is necessary compared to the firmer, packaged Italian savoiardi.