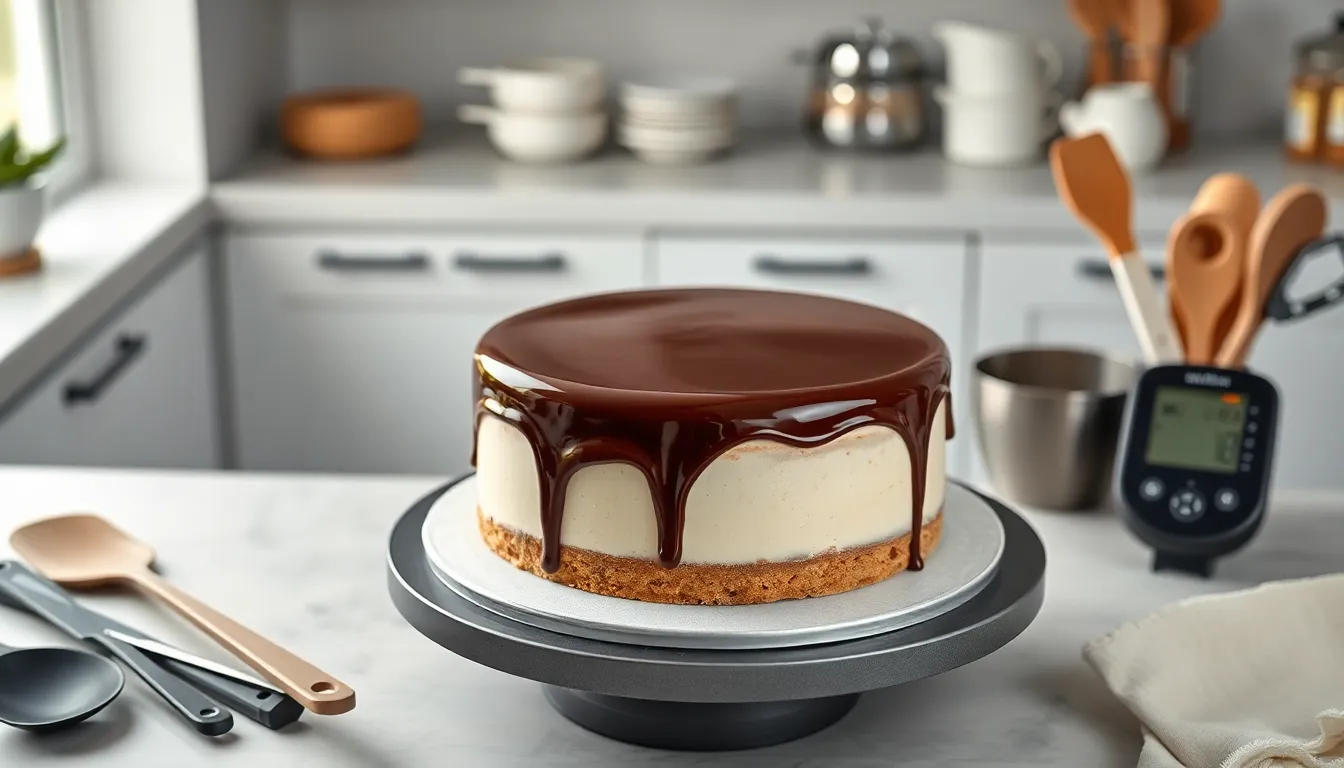
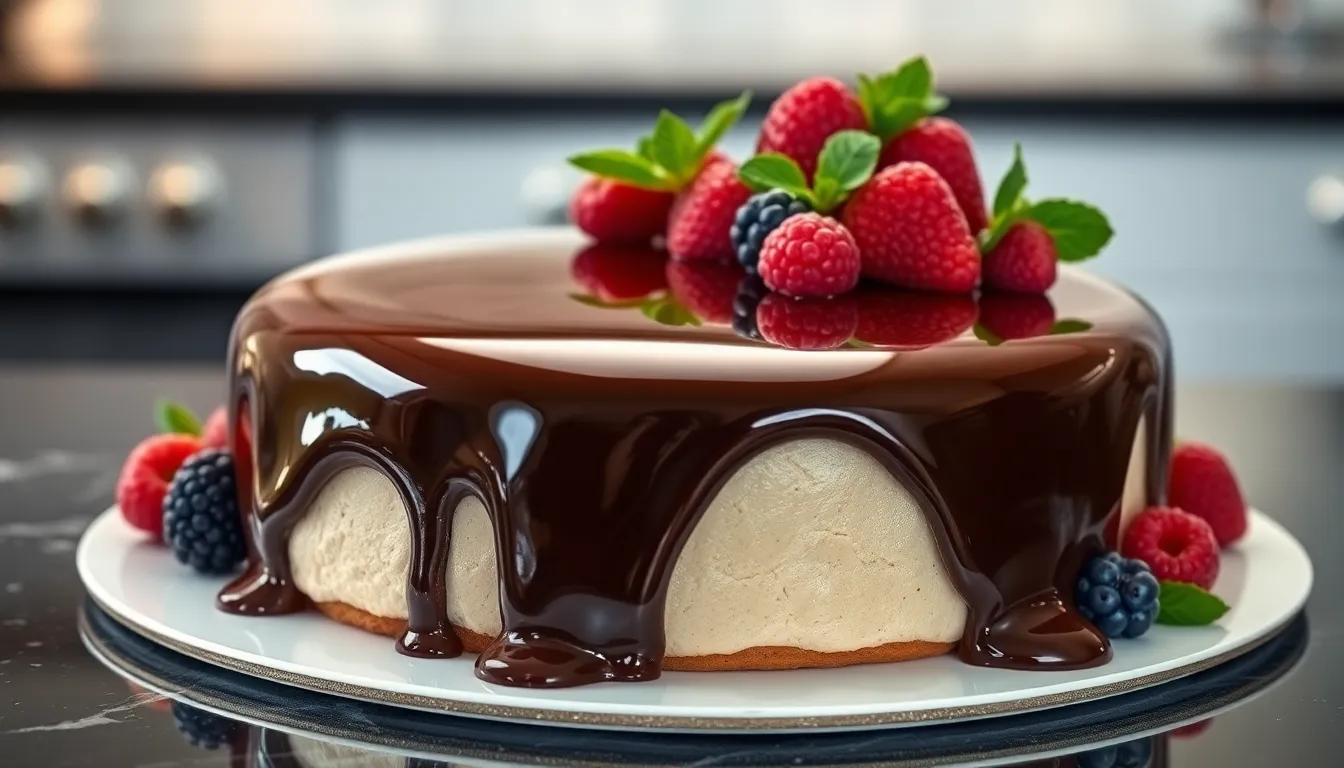
Ever wondered how professional bakers create that stunning glossy finish on chocolate cakes? Chocolate mirror glaze transforms ordinary desserts into showstoppers with its flawless, reflective surface. Ready to elevate your baking game?
A chocolate mirror glaze is the secret weapon in any serious baker’s arsenal. This glossy, smooth coating creates a perfect reflective surface that makes desserts look like they came straight from a high-end patisserie. While it might seem intimidating at first, you’ll be surprised how achievable this technique is with the right recipe and method.
The magic of mirror glaze lies in its combination of chocolate, sweetened condensed milk, and gelatin. When properly prepared and poured at the perfect temperature, it creates that signature glass-like finish that captures everyone’s attention before they even take their first bite. Whether you’re glazing a mousse cake, entremets, or individual pastries, this versatile topping will instantly elevate your dessert game.
What Is Chocolate Mirror Glaze?
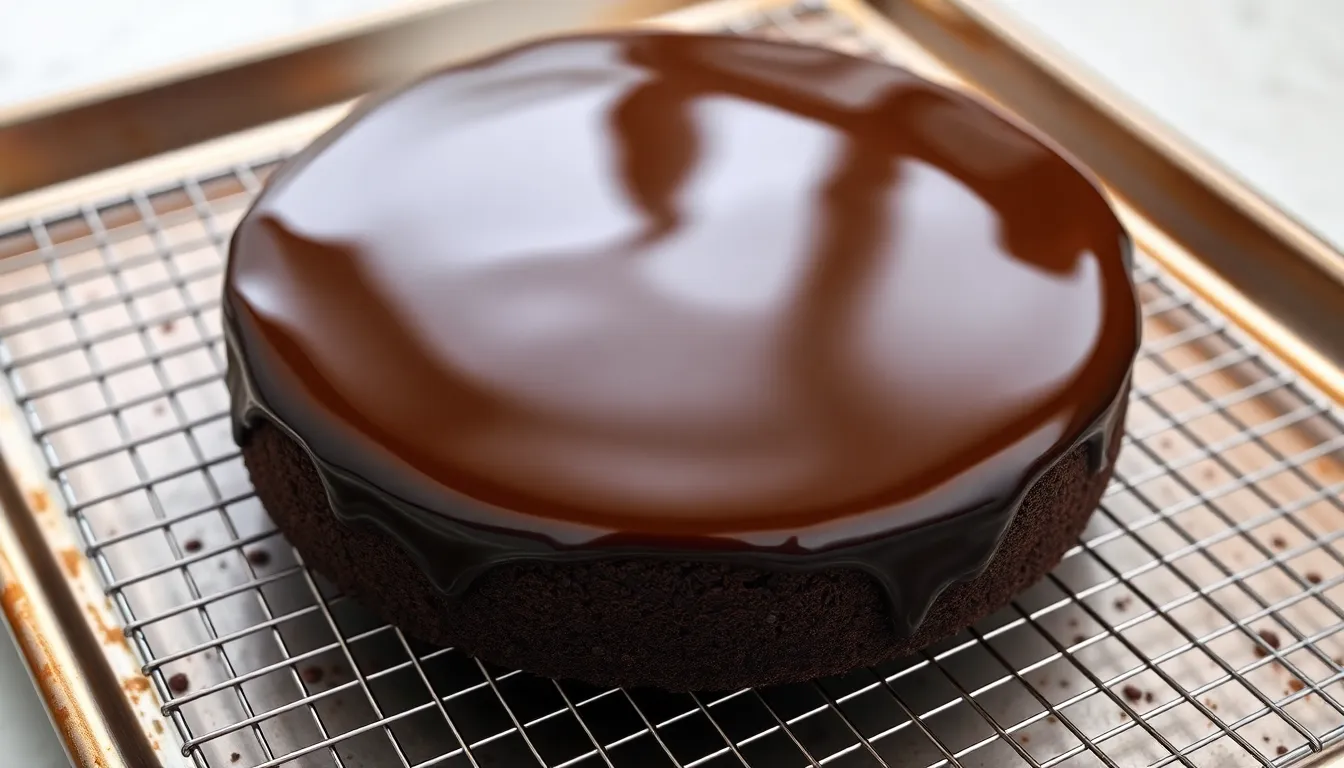
Chocolate mirror glaze is a pourable shiny coating that creates a reflective surface on desserts giving them a professional patisserie appearance. This luxurious finish transforms ordinary cakes into stunning showstoppers with its glass-like quality. The glaze contains gelatin which allows it to set with the perfect consistency while maintaining its glossy appearance.
At its core mirror glaze consists of chocolate sweetened condensed milk gelatin sugar and water. The gelatin provides the stability while the chocolate offers both flavor and color. When properly prepared and poured at the right temperature (typically 90-94°F or 32-34°C) the glaze flows smoothly over the frozen dessert surface.
Professional pastry chefs often use mirror glazes to create that unmistakable high-end finish on entremets mousses and specialty cakes. The technique originated in French pastry making but has become widely popular in modern dessert presentation worldwide. Mirror glaze works best on smooth-surfaced desserts that have been frozen solid allowing the warm glaze to set quickly upon contact.
Unlike traditional ganache or chocolate coatings mirror glaze offers a unique advantage – it doesn’t lose its shine after setting. The reflective quality remains intact thanks to the careful balance of ingredients and proper temperature control during application. This distinguishing characteristic makes chocolate mirror glaze a favorite finishing technique for special occasion desserts and professional bakery displays.


Why You’ll Love This Recipe
This chocolate mirror glaze recipe delivers professional patisserie results right in your kitchen with surprisingly simple techniques. You’ll achieve that coveted glass-like finish that transforms ordinary desserts into stunning centerpieces worthy of display in high-end bakery windows.
Professional pastry chefs worldwide favor this technique because it maintains its shine for days after application. Your friends and family will be impressed by the reflective surface that perfectly captures light and creates a dramatic presentation.
The versatility of this glaze works beautifully on various desserts including mousse cakes, cheesecakes, and entremets. You control the thickness by adjusting the pouring temperature – warmer for a thinner coat and cooler for more coverage.
The recipe requires basic ingredients you likely already have in your pantry: gelatin, cocoa powder, cream, sugar, and water. This accessibility makes it an economical way to elevate your baking without specialty items.
Creating this showstopping finish requires no advanced skills or special equipment. The straightforward process involves simply mixing, heating, and pouring at the right temperature (90°F/32°C) over a chilled dessert.
The rich chocolate flavor complements the visual impact, providing both stunning aesthetics and delicious taste. Your desserts will not only look impressive but deliver on flavor expectations as well.


Equipment Needed
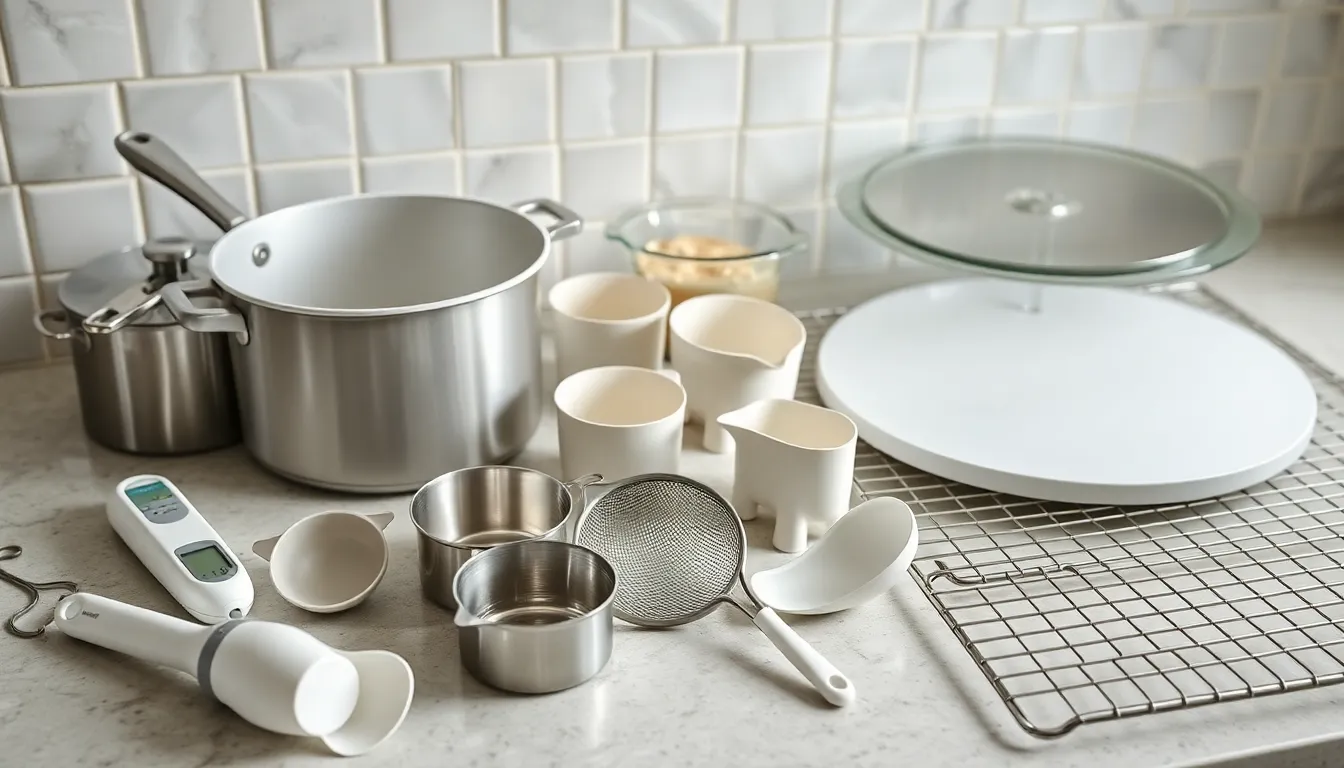
Creating a perfect chocolate mirror glaze requires having the right tools on hand before you begin. Gather these essential items to ensure your glazing process goes smoothly:
- Medium saucepan – For heating your sugar syrup and other ingredients to precise temperatures
- Heatproof mixing bowl – To combine your chocolate and cocoa powder with hot liquids
- Digital food thermometer – Critical for monitoring the glaze temperature (aim for 86-94°F or 30-34°C for ideal pouring consistency)
- Immersion blender – Essential for achieving that perfectly smooth, bubble-free texture
- Fine mesh strainer – Helps remove any unwanted lumps for a flawless finish
- Flexible silicone spatula – For scraping down sides and ensuring all ingredients incorporate fully
- Small bowl – Specifically for blooming your gelatin sheets or powder
- Measuring cups and spoons – For precise ingredient measurements
- Ladle or pouring cup – Offers better control when applying the glaze over your dessert
For optimal results, you should also have:
- Cake turntable – Allows smooth, even application as you rotate your dessert
- Offset spatula – Helps create that perfectly smooth base surface before glazing
- Cooling rack with sheet pan – Catches excess glaze drips for easier cleanup
While professional pastry chefs might use additional specialized equipment, these basic tools will enable you to create stunning mirror-glazed desserts at home. The most important items are the thermometer and immersion blender, as temperature control and perfect smoothness are key factors in achieving that coveted glass-like finish.


Ingredients
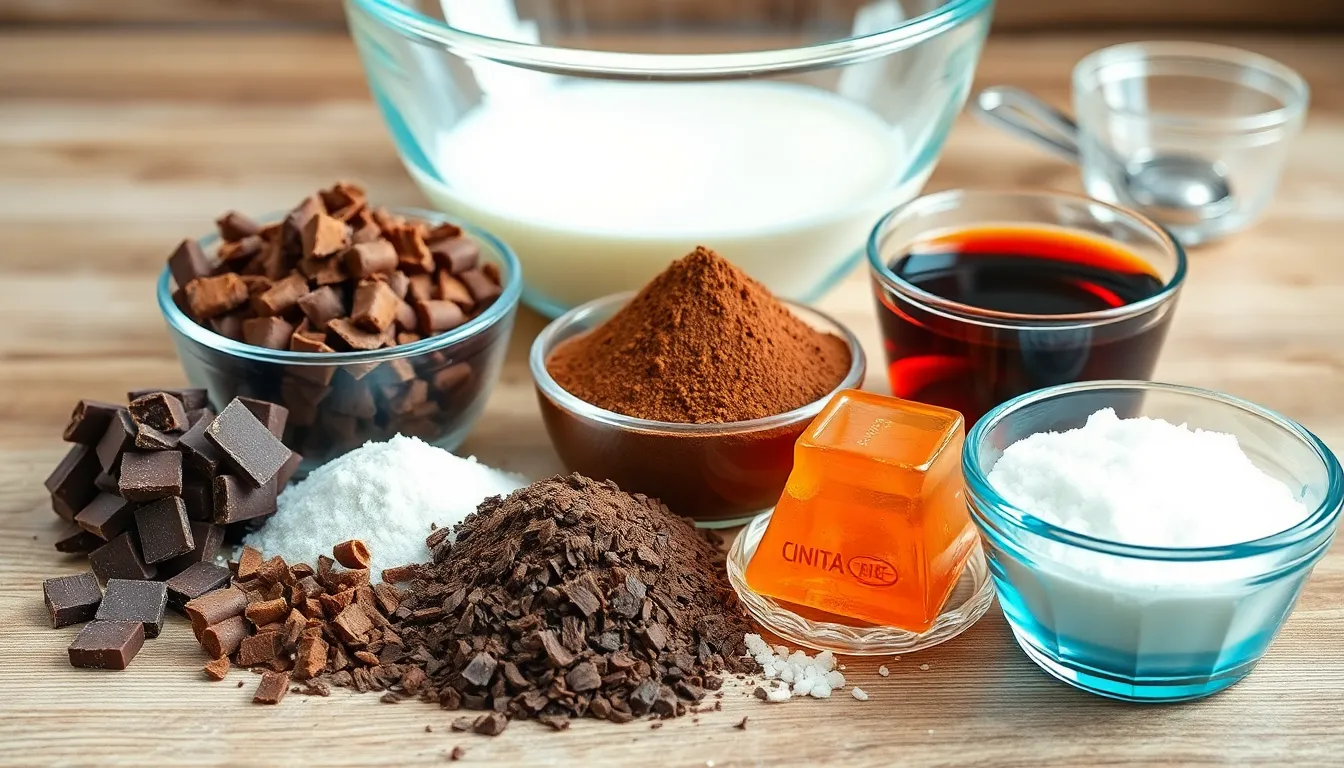
Creating the perfect chocolate mirror glaze requires quality ingredients in precise measurements to achieve that stunning reflective finish. Let’s break down what you’ll need for each component of this professional-looking glaze.
Chocolate Base
- 350g high-quality dark chocolate, finely chopped
- 40g unsweetened cocoa powder
- 200g sweetened condensed milk
- 300g granulated sugar
- 120g water
- 1 tablespoon vanilla extract (optional)
The chocolate base forms the foundation of your mirror glaze, providing both flavor and color. Select a premium dark chocolate with 55-70% cocoa content for the best results. The cocoa powder intensifies the chocolate flavor while deepening the color of your finished glaze. Sweetened condensed milk contributes a silky texture and necessary richness that helps create that perfect consistency.
Gelatin Mixture
- 15-19g powdered gelatin (or equivalent sheet gelatin)
- 100-200g cold water for blooming
The gelatin mixture is crucial for achieving the proper setting and shine in your mirror glaze. Gelatin provides the structural integrity that allows the glaze to set while maintaining its reflective quality. You must properly bloom the gelatin by sprinkling it over cold water and allowing it to absorb completely before incorporating it into your hot mixture. This careful preparation prevents unwanted lumps and air bubbles that could diminish the mirror-like finish of your glaze.


How To Make Chocolate Mirror Glaze
Creating a flawless chocolate mirror glaze requires precision in both technique and temperature control. Follow these step-by-step instructions to achieve that stunning reflective finish on your desserts.
Prepare The Gelatin
Begin by properly blooming your gelatin to ensure a smooth final texture. For powdered gelatin, mix it with cold water using a 1:5 ratio (gelatin to water) and let it absorb the liquid for 5-10 minutes until fully swollen. If using gelatin sheets instead, submerge them in icy cold water for about 10 minutes until they become soft and pliable. Once softened, gently squeeze out any excess water from the sheets before incorporating them into your mixture. Proper blooming prevents unpleasant lumps in your final glaze and ensures proper setting.
Cook The Sugar Syrup
In a medium saucepan, combine your water, granulated sugar, and cocoa powder. Whisk these ingredients together thoroughly while the mixture is still cold to create a smooth slurry without lumps. Place the saucepan over medium heat and bring the mixture to a boil while stirring constantly to prevent the cocoa from scorching. Add heavy cream to the boiling mixture and continue heating until it reaches a second boil. Constant stirring during this process is crucial as it prevents burning and ensures even heat distribution throughout the mixture.
Combine With Chocolate
Pour your hot sugar syrup through a fine-mesh strainer to remove any undissolved cocoa particles or impurities. Add the bloomed gelatin to the hot strained mixture and stir gently until completely dissolved. Pour this hot liquid over chopped chocolate in a heatproof bowl and allow it to sit undisturbed for about 5 minutes, giving the chocolate time to melt from the residual heat. Use an immersion blender to create a perfectly smooth mixture, keeping the blender head submerged to avoid incorporating air bubbles which would diminish the mirror-like quality of your glaze.
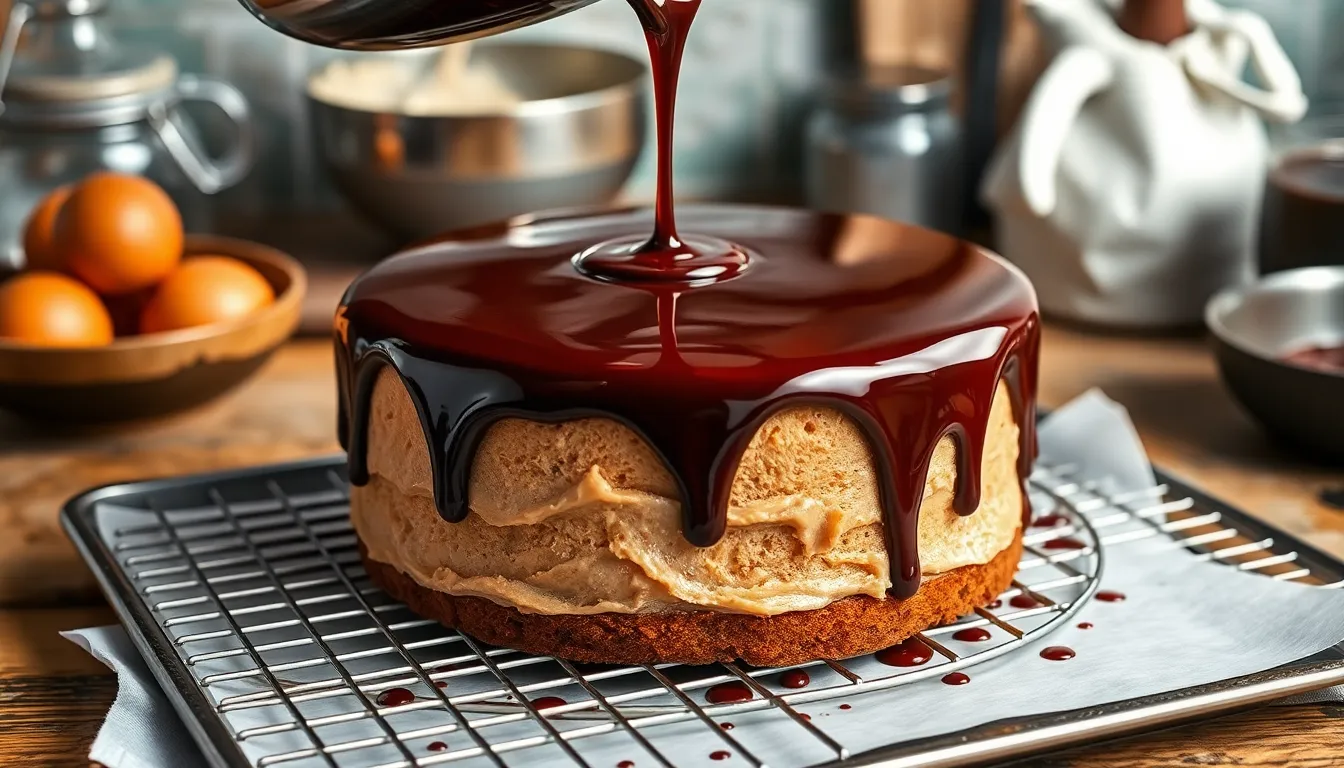
Cool The Glaze
Allow your glaze to cool to the optimal pouring temperature of 90°F (32°C). This exact temperature ensures the glaze is fluid enough to create a smooth coating while being cool enough to set properly on your chilled dessert. Pour the glaze evenly over a completely frozen cake or dessert positioned on a cooling rack with a sheet pan underneath to catch the excess. The glaze will set quickly on contact with the cold surface, creating that characteristic glossy mirror finish. Let any excess glaze drip off completely before transferring your dessert to a serving plate or storage container.


Tips For Perfect Mirror Glaze
Creating that professional-looking shine requires attention to detail and precision. Follow these expert tips to achieve a flawless chocolate mirror glaze that will transform your desserts into showstoppers.
Temperature Control
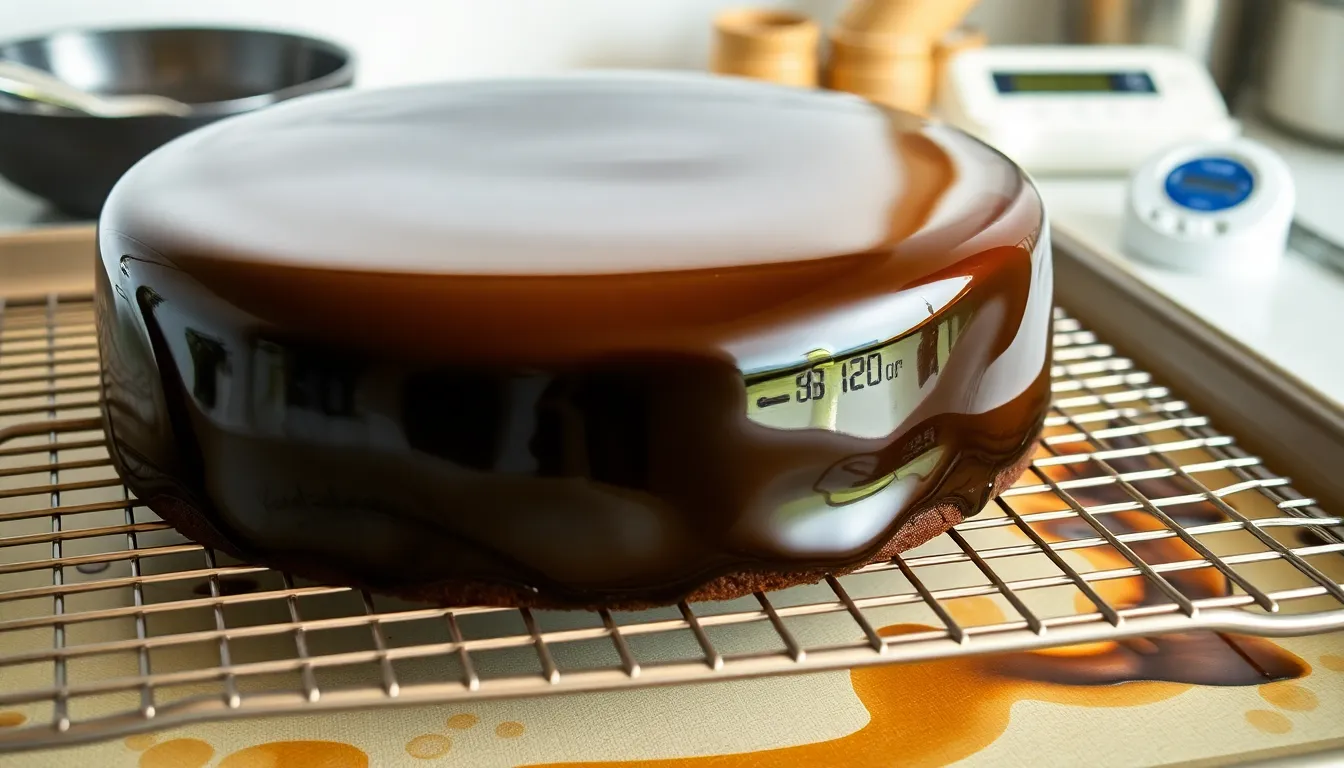
Temperature management is absolutely critical when working with mirror glaze. Your glaze must be poured at approximately 90°F (32°C) onto a frozen or thoroughly chilled dessert for optimal results. This temperature contrast allows the glaze to set quickly while maintaining its reflective quality. Using a digital food thermometer takes the guesswork out of this process and ensures consistency.
Avoid overheating your chocolate mixture as this can burn the cocoa solids and create a grainy texture. When combining ingredients, maintain gentle heat and stir constantly to distribute warmth evenly throughout the mixture. Allow your completed glaze to cool naturally to the proper pouring temperature rather than rushing this process with ice baths, which can cause uneven cooling and affect the final shine.
Working Surface
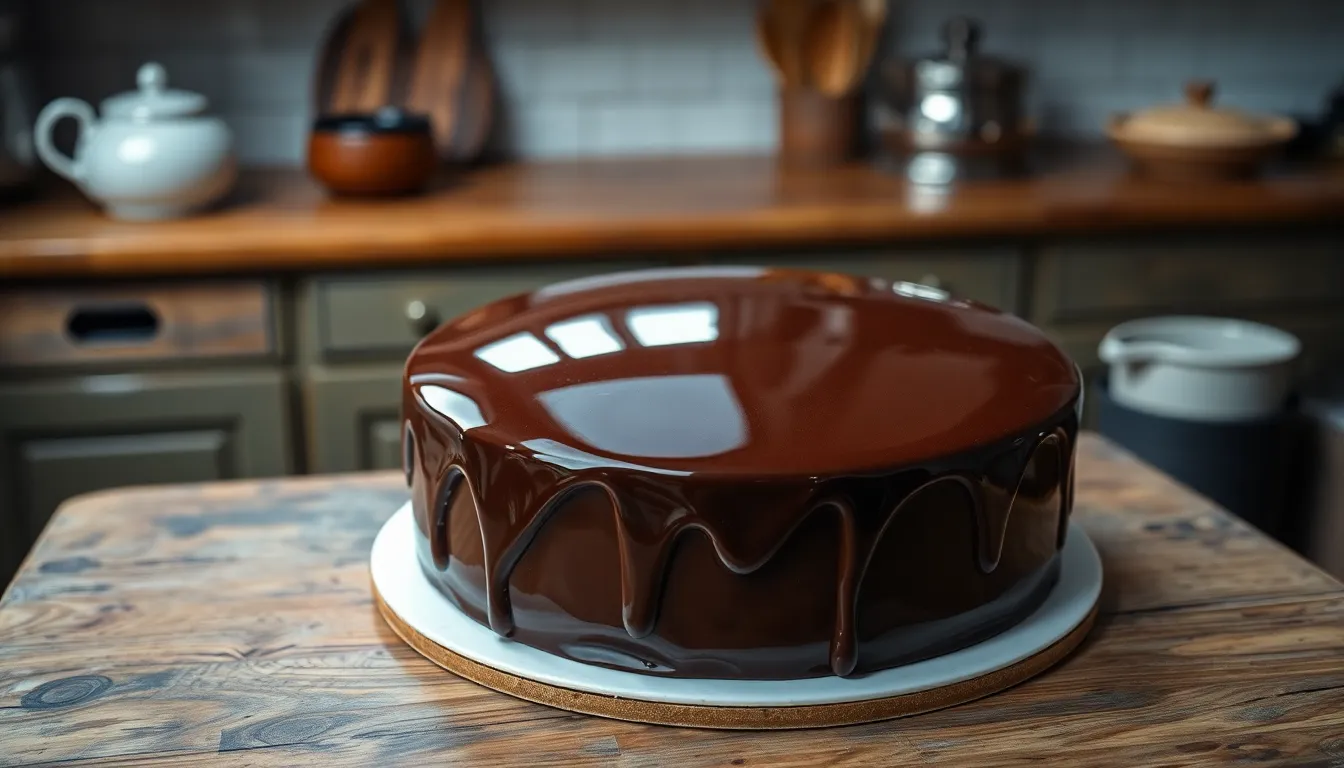
The foundation of a perfect mirror glaze lies in what’s beneath it. Your cake or dessert surface must be impeccably smooth before glazing. Mousse cakes or desserts covered with a thin layer of buttercream work exceptionally well as they provide an ideal base for the glaze to adhere to and display its reflective properties.
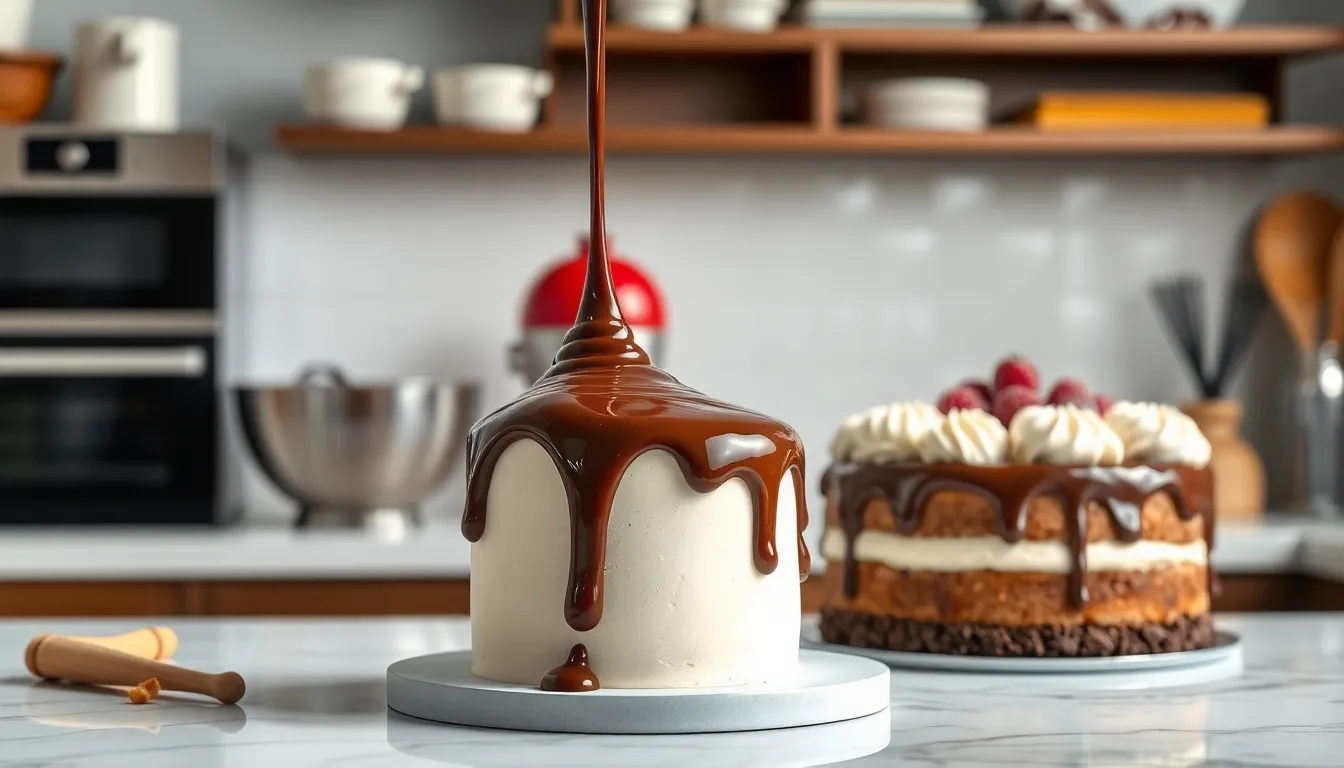
Elevate your dessert on a cooling rack positioned over a sheet pan before pouring to catch excess glaze. This setup allows for complete coverage while minimizing mess. Minimize agitation when handling your prepared glaze to prevent air bubbles from forming. If bubbles do appear, gently tap the container on your countertop or carefully run an immersion blender (fully submerged) through the mixture without incorporating additional air. For professional-level results, perform the final pour in one smooth, continuous motion from the center outward, allowing the glaze to cascade naturally over the sides of your dessert.


How To Apply Mirror Glaze
Applying mirror glaze is the moment of truth that transforms your dessert into a stunning showpiece. This technique requires careful preparation and execution but delivers remarkable results that will impress even the most discerning guests.
Preparing Your Cake
Proper cake preparation is crucial for mirror glaze success. Your cake must have a perfectly smooth surface and be thoroughly chilled before glazing. Mousse cakes and entremets work exceptionally well with mirror glaze because of their smooth exterior and ability to hold shape when frozen.
Begin by ensuring your cake has an even finish – those covered in buttercream or mousse should be frozen for at least 1 hour before glazing. This firmness provides the ideal base for the glaze to adhere and set properly. Mousse cakes require complete freezing and often benefit from using a silicone mold to achieve perfect shapes before the glazing process.
Place your frozen cake on a wire cooling rack positioned over a baking sheet to catch excess glaze. This setup allows for easy clean-up and collection of extra glaze that can potentially be reused. Elevating the cake on a pedestal or inverted bowl creates additional height for better pouring access and more dramatic dripping effects.
Remove any frost or ice crystals from the surface of your frozen cake with a paper towel before glazing. These moisture particles can create imperfections in your final mirror finish. Double-check that your cake is level for an even glaze distribution.
Pouring Technique
The pouring process requires confidence and precision for optimal results. Your chocolate mirror glaze should reach the ideal temperature of 90-94°F (32-34°C) before pouring – use a digital thermometer for accuracy. At this temperature, the glaze achieves the perfect consistency that’s fluid enough to pour smoothly yet thick enough to adhere properly.
Start pouring from the center of your cake in a steady, continuous motion. Work outward in a spiral pattern to ensure complete coverage of the top surface. The glaze should flow naturally down the sides without assistance. Resist the urge to touch or spread the glaze as it flows – this can create unwanted marks or streaks in your mirror finish.
Pour generously to ensure complete coverage, as you’ll need enough volume to create that seamless reflective surface. The frozen cake will set the glaze quickly upon contact, creating that signature glossy finish. Allow the glazed cake to set undisturbed for approximately 5 minutes before making any adjustments.
For a clean final presentation, trim excess drips from the bottom edge using a hot knife after the glaze has set for a few minutes. Transfer your glazed masterpiece to a serving plate using an offset spatula or cake lifter. Remember that while mirror glaze maintains its shine for several days, it looks most spectacular within the first 24 hours after application.


Ingredients for Chocolate Mirror Glaze
- 2 tablespoons (14g) powdered gelatin
- ¼ cup (60ml) cold water
- 1 cup (200g) granulated sugar
- ⅔ cup (160ml) heavy cream
- ⅓ cup (28g) unsweetened cocoa powder
- ½ cup (120ml) water (for cocoa slurry)
- 7 oz (200g) high-quality dark chocolate, chopped
- Optional: 1 teaspoon vanilla extract


Color Variations

While classic chocolate mirror glaze delivers a rich dark brown finish, the true versatility of this technique lies in its incredible color possibilities. The standard chocolate version can easily transform into a rainbow of options with a few simple modifications.
White chocolate serves as the perfect blank canvas for creating colored mirror glazes. By substituting dark chocolate with white chocolate and omitting cocoa powder, you create a neutral base that accepts food coloring beautifully. This white base allows you to achieve vibrant colors that wouldn’t be possible with a dark chocolate foundation.
Gel food coloring works best for tinting mirror glazes as it provides intense color without adding excess liquid that could affect the setting properties. Add small amounts at first – a little goes a long way – and gradually build up to your desired shade. Remember that colors often appear more vibrant in the warm glaze and may darken slightly as they set.
Creating multi-colored effects elevates your mirror glaze to professional status. Try these popular techniques:
- Marbled effect: Pour different colored glazes randomly over your dessert and gently swirl them together with a toothpick or skewer
- Galaxy effect: Combine deep blue, purple, and black glazes with touches of white and pink, then add edible metallic dust for a cosmic appearance
- Ombré look: Pour rings of progressively lighter or darker shades of the same color for a gradient effect
Seasonal color schemes add thematic flair to your mirror-glazed creations. Holiday-appropriate colors like red and green for Christmas or orange and black for Halloween make your desserts instantly festive. Gold and silver mirror glazes, achieved with specialized food coloring, create particularly elegant finishes for wedding cakes or anniversary celebrations.
The temperature at which you pour different colored glazes remains consistent with the standard chocolate version – aim for 90-94°F (32-34°C) regardless of color. This ensures proper setting and maintains that characteristic mirror-like shine across all color variations.
For truly dramatic effects, consider dividing your base glaze into several portions and coloring each differently. This approach allows for complex designs and color combinations that will make your desserts truly unforgettable. The possibilities are virtually endless, limited only by your imagination and color-mixing skills.


Storage And Make-Ahead
Your gorgeous chocolate mirror glaze doesn’t need to be used immediately. With proper storage techniques you can prepare this stunning finish ahead of time for convenience without sacrificing quality.
Refrigeration Options
Store unused chocolate mirror glaze in the refrigerator for up to one week in an airtight container. Cover the surface directly with plastic wrap to prevent a skin from forming and seal tightly to lock in moisture. The refrigeration method works perfectly for short-term storage when you plan to use the glaze within days. Remember to label your container with the date to track freshness.
Freezing For Later Use
For longer storage periods extend your mirror glaze’s shelf life by freezing it for several months. Vacuum-sealed storage provides optimal results by preventing air exposure that can degrade both appearance and flavor. When vacuum sealing isn’t available triple-bag the glaze in freezer-safe zipper bags after removing as much air as possible. Always label frozen glaze with the date and contents for easy identification.
Reheating Instructions
Gently reheat refrigerated or frozen mirror glaze to restore its pourable consistency:
- Transfer the glaze to a heatproof bowl
- Warm over a double boiler stirring occasionally until the temperature reaches 90-94°F (32-34°C)
- Alternatively microwave in 15-second intervals stirring between each until the target temperature is reached
- Strain the reheated glaze through a fine-mesh sieve to remove any lumps or bubbles
- Use an immersion blender briefly if needed to restore smoothness
Storing Glazed Desserts
Once applied to your dessert the mirror glaze acts as a protective coating. Store glazed cakes in the refrigerator where they’ll maintain their shine for several days. The glaze prevents moisture loss keeping your dessert fresh. Glazed creations can remain at room temperature for serving provided the ambient temperature stays below 77°F (25°C) as higher temperatures will cause melting.
Repurposing Leftover Glaze
Don’t discard excess glaze after coating your main dessert. Repurpose leftover mirror glaze by:
- Drizzling over cupcakes for a professional finish
- Coating cake pops or truffles
- Adding a glossy topping to brownies or cookies
- Serving as a decorative sauce with ice cream
This versatility makes preparing a full batch worthwhile even for smaller desserts as the remainder becomes a valuable ingredient for future creations.


Common Troubleshooting
Even experienced bakers encounter challenges when working with chocolate mirror glaze. Understanding these common issues and their answers will help you achieve that perfect reflective finish every time.
Glaze Sliding Off the Cake
Your beautifully prepared mirror glaze might slide right off the dessert if condensation forms on the frozen cake surface. This moisture creates a barrier that prevents proper adhesion.
To prevent this frustrating issue, only remove a few frozen cakes from the freezer at a time. Apply the glaze immediately before condensation has a chance to form on the cold surface. Working quickly and methodically ensures the glaze adheres properly to create that stunning mirror effect.
Bubbles in the Glaze
Mirror glazes have a relatively thick consistency which means bubbles don’t naturally rise and burst as they would in thinner liquids. These trapped air bubbles create an uneven surface that ruins the reflective quality.
Excessive stirring and repeatedly reheating solidified glaze are primary causes of bubble formation. When bubbles appear, you have two effective options for removal: carefully prick individual bubbles with a toothpick or lightly pass a kitchen torch over the surface to pop them without damaging the glaze.
Lumps or Chunks in the Glaze
Nothing ruins a mirror glaze faster than unsightly lumps disrupting your smooth surface. Cocoa powder tends to clump when added directly to liquid ingredients.
Mix your cocoa powder and sugar together before incorporating them into the liquid components. This pre-mixing breaks up potential clumps before they form. Also, always strain your completed glaze through a fine-mesh sieve or process it with an immersion blender to eliminate any remaining lumps before pouring.
Gelatin Issues
Proper gelatin handling makes the difference between a perfectly set glaze and a runny disappointment. Adding gelatin too early during the heating process can degrade its setting properties.
Incorporate gelatin off heat or after the heating stage to ensure it maintains its ability to set properly. When using sheet gelatin, properly hydrate it in cold water and squeeze out excess moisture before adding it to your hot mixture. This careful timing and preparation ensure your glaze achieves the perfect consistency and shine.
| Issue | Primary Cause | Solution |
|---|---|---|
| Sliding Glaze | Condensation on frozen cake | Glaze immediately after removing from freezer |
| Bubbles | Over-stirring, reheating | Use toothpick or torch to pop bubbles |
| Lumps | Improper mixing of cocoa | Pre-mix dry ingredients, strain final glaze |
| Failed Setting | Improper gelatin handling | Add gelatin off heat, properly hydrate sheets |
By addressing these common issues with the right techniques, your chocolate mirror glaze will transform from potentially problematic to perfectly polished. The reflective finish you achieve will rival professional patisserie creations and elevate your desserts to showstopping status.


Serving Suggestions
Transform your mirror-glazed creation from stunning to spectacular with these professional serving ideas:
- Present your glazed cake on a clean white or black platter to maximize the reflective quality of the mirror finish. The contrast creates a dramatic visual effect that highlights the glaze’s shine.
- Transfer your masterpiece with extreme care using a cake lifter or two offset spatulas to preserve the perfect finish. Place your tools underneath the cake simultaneously and lift gently to avoid fingerprints or smudges.
- Consider pairing mirror-glazed desserts with complementary elements like fresh berries, edible gold leaf, or a light dusting of edible gold powder for a truly luxurious presentation. These embellishments enhance the elegant appearance without overwhelming the mirror effect.
- Serve your chocolate mirror glaze on mousse cakes or layered chocolate entremets for the most impressive results. The smooth base of these desserts provides the ideal canvas for the glaze to display its reflective properties.
- Maintain proper temperature when serving—remove the glazed dessert from refrigeration about 15-30 minutes before serving to allow flavors to develop fully while maintaining structural integrity.
- Slice your creation with a hot, clean knife for the cleanest cuts through the mirror glaze. Wipe the blade between each slice to ensure every portion looks as good as it tastes.
- Photograph your masterpiece under natural light but away from direct sunlight to capture the true brilliance of your mirror glaze before serving. This preserves the memory of your achievement before it’s devoured by appreciative guests.
Any excess glaze can be refrigerated in an airtight container and reheated gently for future use, making it a practical option for professional bakers and enthusiastic home cooks alike.


Conclusion
Chocolate mirror glaze transforms ordinary desserts into bakery-worthy masterpieces with its stunning reflective finish. You’ll find that mastering this technique opens up endless creative possibilities for your baking repertoire.
With proper temperature control and the right tools you can achieve professional results that will impress even the most discerning guests. Remember that practice makes perfect – your first attempt might not be flawless but each time you’ll improve.
The versatility of mirror glaze allows you to customize colors and effects for any occasion while its make-ahead potential makes it practical for busy bakers. So go ahead and elevate your desserts with this showstopping finish that’s as delicious as it is beautiful.
Frequently Asked Questions
What is a chocolate mirror glaze?
A chocolate mirror glaze is a pourable shiny coating that creates a glass-like, reflective surface on desserts. Made from chocolate, sweetened condensed milk, gelatin, sugar, and water, it transforms ordinary cakes into professional-looking pastries. When applied correctly, it maintains its shine for days, making it perfect for special occasion desserts.
At what temperature should I pour mirror glaze?
Pour chocolate mirror glaze at 90-94°F (32-34°C) for optimal results. This temperature ensures the glaze is fluid enough to pour smoothly while still thick enough to adhere properly to the dessert. Always use a digital food thermometer for accuracy, as temperature control is crucial for achieving that perfect mirror-like finish.
Do I need special equipment to make mirror glaze?
No specialized equipment is required. Basic kitchen tools are sufficient: a medium saucepan, heatproof mixing bowl, digital thermometer, immersion blender, fine mesh strainer, silicone spatula, and measuring tools. For better results, a cake turntable, offset spatula, and cooling rack with sheet pan are helpful but not essential.
Can I make mirror glaze ahead of time?
Yes, mirror glaze can be made ahead of time. It can be refrigerated for up to a week or frozen for several months in airtight containers. To reuse, gently reheat in a heatproof bowl over simmering water until it reaches pouring consistency, then cool to 90-94°F (32-34°C) before using.
Why is my mirror glaze sliding off the cake?
Mirror glaze slides off when the dessert isn’t cold enough or when condensation forms on the surface. Ensure your dessert is thoroughly frozen (not just refrigerated) before glazing. Also, avoid taking the dessert in and out of the freezer multiple times, which can create moisture on the surface.
How do I get a colored mirror glaze?
For colored mirror glaze, use white chocolate as your base instead of dark chocolate. Add gel food coloring (not liquid) to achieve your desired color. For special effects like marbled or galaxy designs, divide the white glaze into portions, color each differently, then pour them together over your dessert.
How do I fix bubbles in my mirror glaze?
To prevent bubbles, use an immersion blender rather than whisking, and blend gently to avoid incorporating air. If bubbles appear in the finished glaze, pop them with a toothpick before the glaze sets. Straining the glaze through a fine-mesh sieve before pouring can also help eliminate bubbles.
What desserts work best with mirror glaze?
Mousse cakes and entremets work best with mirror glaze due to their smooth surfaces and ability to be frozen solid. Cheesecakes, bavarian creams, and other molded desserts with a stable, smooth exterior also work well. The dessert must have a flat, even surface and be completely frozen before glazing.
How long does mirror glaze stay shiny?
A properly made chocolate mirror glaze maintains its shine for 3-5 days when stored properly. Keep the glazed dessert refrigerated but not frozen after the glaze has set. Avoid touching the surface or covering it with plastic wrap, which can damage the shine. For maximum glossiness, serve within 48 hours.
Can I reuse leftover mirror glaze?
Yes, leftover mirror glaze is completely reusable. Collect drips in a container, strain if necessary, and store in an airtight container in the refrigerator or freezer. When ready to reuse, gently reheat to liquid consistency, then cool to proper pouring temperature. You can reuse it multiple times without quality loss.